The  Stats resurgence continued in the round-of-eight, as the Shield of Aiur advanced in second place from Group B to book a spot in the semifinals. Stats’ initial 2-0 win over SHIN looked like a vintage performance, with his famed defense winning out over SHIN’s aggressive tactics. However, he showed he still had much ground to make up in the winners’ match, failing to close out two advantageous maps against Cure in a 1-2 loss. Fortunately for Stats, he did not come to regret this missed opportunity as he took another 2-0 against SHIN in the group’s decider match.
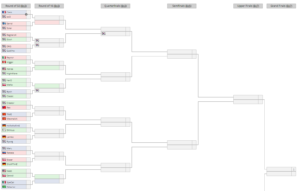
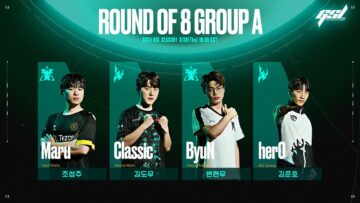
With Group B concluded, Code S now heads into final matchday on Thursday, Apr 11 9:30am GMT (GMT+00:00) where both semifinals AND the grand finals will be played. A Terran vs Protoss grand finals is guaranteed, as herO and Stats will face off in semifinal #1 while Cure and Maru will clash in semifinal #2.
Recommended Game(s)
Initial Match #2: Cure vs GuMiho – Game 1 (VOD): While many of GuMiho’s basetrade attempts are futile, last-ditch attacks, sometimes they result in a gloriously entertaining brawl. Cure may have won this game in the end, but the hoops GuMiho made him jump through to get there makes it understandable why Cure called him a “sicko.”
Match Recaps
[embedded content]
Initial Match #1: Stats 2 – 0 SHIN
Game 1 – Amphion (Stats win): SHIN was the first player to bring a strategy tailored to one of this season’s new maps, quickly mining through BOTH left-side mineral walls on Amphion to launch a one-base Zergling-Baneling all-in (using a proxy-Hatchery to help mine through the second wall). It looked like it would be a quick GG from Stats after he was caught off guard, but some evasive Probe maneuvers and quick focus fire on Banelings allowed him to stabilize without taking catastrophic damage.
Even after killing several Probes, SHIN was still left playing from far behind since he had opened with a one-base build against the two-base Stats. Stats’ economic advantage snowballed quickly, and he finished off SHIN with a Blink-Stalker attack.
Game 2 – Ghost River (Stats win): The two players looked to get under each other’s skin early on with a Pylon block vs offensive Hatchery, but they arrived at a normal-ish macro build-up scenario nevertheless.
SHIN seemed to be headed for Lurker tech after adding a Hydra Den, but it was a fakeout as he pivoted to heavy Roach-Ravager pressure in the mid-game. The move seemed like it might work as he hit a window just before Psionic Storm research was complete, but Stats managed to just barely hold off the first attack. Still, Stats wasn’t out of the woods yet, as SHIN was prepared to reload and attack several more times.
This was where we got to see an old school Shield of Aiur performance from Stats, as he just barely parried each attack—all while continuing to upgrade his army off of two Forges. Eventually, Stats stabilized with a 3/2/0 upgraded army against SHIN’s 0/1/0, and the tables were flipped with the Protoss forces looking to go on the counterattack.
SHIN took the risk of splitting his forces on defense, committing most of his Banelings to backdoor attacks while leaving his Roach-Ravager to defend back at home. While SHIN’s Banelings did succeed at killing a ton of Probes, his main army failed to hold the line and left him with no choice but to surrender.
Initial Match #2: Cure 2 – 0 GuMiho
Game 1 – Site Delta (Cure win): The early-game saw GuMiho play an aggressive style with fast tech against Cure’s more economy focused build. As often happens in Code S-level TvT’s, the early skirmishing ultimately resulted in both players settling on fairly even 3-base footing, massing Marine-Tank armies and looking to the mid-game.
The two players commenced the classic Marine-Tank positional wars, with Cure seizing the initiative and playing on GuMiho’s side of the map. While GuMiho defended well and kept the supply and expansion counts close, Cure’s constant pressure left him unable to keep up in Refinery count. The difference in gas income became apparent as the two players maxed out, with GuMiho being stuck on almost pure Marine-Tank while Cure was able to add Vikings to his army mix.
GuMiho momentarily overcame his composition disadvantage through superior movement, misdirecting Cure’s forces to get a free kill on the enemy’s fourth base. However, Cure was quick to rally his superior army for a counterattack, forcing GuMiho to either face him in a difficult direct engagement or commit to a basetrade. Of course, GuMiho decided to basetrade, plunging the game into chaos.
What initially seemed like a futile last gasp from GuMiho turned into a surprisingly tight ending sequence, with GuMiho very nearly pulling things back to even with his constant backdoor attacks. However, Cure was just steady enough to win out in the end, using his Raven advantage to win the game deciding fight at around the 23-minute mark.
Game 2 – Oceanborn (Cure win): Both players took a very passive approach to start, going almost directly to their late-game armies with just a few small detours. GuMiho went for his pet mech composition with a heavy focus on Thors, while Cure went for mass Liberator sky Terran with a smattering of ground support.
The initial clashes between end-game armies seemed to favor Cure, as he pushed the fighting to narrow corridors where Thors couldn’t bring all their firepower to bear. But when Cure relocated to a less advantageous position, GuMiho showed why Thors are technically the counter to Liberators, fighting in a wide arc and inflicting heavy casualties on Cure’s forces.
GuMiho moved quickly to consolidate his advantage before Cure could replenish his supply, taking out a number of bases and pinning Cure back in a defensive position. However, GuMiho ended up overextending his advantage, splitting up his Thors without giving them proper support. One half of the unprotected Thors were wiped out by Marine-Marauder, while the other half were taken out by an overwhelming number of newly built Liberators.
Cure then went for his own counterattack, going straight for the heart of GuMiho’s main. GuMiho had plenty of resources but no time to replenish his lost supply, and surrendered once Cure camped his factories.
Winners’ Match: Cure 2 – 1 Stats
Game 1 – Site Delta (Stats win): Cure opened greedy by going for fast 3-CC after Reactor, while Stats played a more conventional Robotics-Colossus opener. Cure tested Stats’ defenses once he had Stim and Medivacs online, but Stats parried the attacks without taking any meaningful damage.
Once Stats had a decent number of Colossus in his ground army and a completed Dark Shrine, he decided it was his turn to probe his opponent’s defenses. While his main army threatened Cure’s third base, a Warp Prism slipped into the Terran main to summon a round of Zealots and DT’s. This rather rudimentary tactic worked perfectly as Cure fell completely apart on both fronts, forcing the GG.
Game 2 – Oceanborn (Cure win): Stats opened with defensive Blink against an uneventful 2-Mine drop from Cure, which led into both players macroing up quietly on their respective halves of the map. Similar to the previous game, Cure poked around once he had Medivacs and Stim, but failed to find any openings to deal meaningful damage. Stats played with a longer view this time around, assembling a Colossus and Disruptor-centric army in the mid-game while eyeing a gradual transition to Carriers.
Stats’ plan worked out perfectly at first, as he chunked out portions of Cure’s army with Purification Novas while his Carrier tech switch went seemingly unnoticed. However, Stats got careless when his first handful of Carriers arrived on the battlefield, moving out with the majority of his forces while leaving ONLY Disruptors to defend his key expansions. Cure didn’t miss this golden opportunity, sending a detachment of infantry to blow up five unaccompanied Disruptors and two of Stats’ key bases.
This devastating economic blow left Stats hurrying to inflict some damage of his own before Cure could mass enough anti-air to handle the Carriers. However, the resource advantage for Cure was too great, and he eventually wore Stats down with freshly produced infantry and Vikings.
Game 3 – Alcyone (Cure win): Stats passed the early-game defensive test once more, handling Cure’s Mine-drop, Tank push, and follow-up infantry drops without too much difficulty. With a solid economic base, Stats repeated his almost-winning game plan from the previous map, assembling a Colossus-Disruptor army before transitioning into Carriers. Cure was more prepared for the Carrier transition this time around, matching Stats’ tech and massing Vikings for a late-game showdown.
Unfortunately for Stats, he repeated some of his questionable army movements from game two, again leaving his key expansions wide open to get sniped by commando squads of Terran troops. But at least this time, he didn’t lose any core support units for his Carriers, and he eventually assembled a Carrier-Disruptor-Stalker-Templar deathball.
After dancing around the edge of Terran territory, Stats found the game-swinging fight he needed, blanketing Cure’s Vikings with Storm and turning the game back in his favor. Having broken the core of Cure’s force, Stats looked to be well on his way to stabilizing his resource situation and consolidating his lead.
However, poor army positioning proved to be Stats’ downfall once again. Moving in on one of Cure’s key expansions, Stats’ Stalker escort detached from the Carrier-Disruptor core to hit the Planetary Fortress, leaving the fragile, high-tech units wide open (all the more baffling because he knew a Terran army was close by). Cure didn’t hesitate to pounce on the split-up Protoss forces, wiping them out and forcing the GG.
Losers’ Match: SHIN 2 – 1 GuMiho
Game 1 – Post Youth (GuMiho win): GuMiho opened with a single proxied Barracks for some Reaper harassment, but otherwise played to the map and went for a passive macro build-up. SHIN had the same idea, tiding himself over with Roach-Ravager-Bane in the mid-game while teching up to Hive. While GuMiho picked off one of SHIN’s outermost expansions with a pre-Hive Marine-Tank push, ultimately both players arrived at their late-game setups mostly unhindered. SHIN decided to go for an Ultralisk-centric army, while GuMiho opted for a typical infantry + Ghosts and Tanks force.
SHIN’s first big move with his Ultralisks was to launch a disastrous attack into a narrow Terran choke, which instantly swung all the momentum in GuMiho’s favor. GuMiho counterattacked and took down a key Zerg expansion, while further solidifying his own resource foundation back at home. While SHIN was much, much more efficient in subsequent fights, he couldn’t fully recover from his economic disadvantage and had to concede defeat.
Game 2 – Crimson Court (SHIN win): GuMiho opened with a 2-Rax Reaper expansion, which SHIN responded to by getting a fast Lair and late third at his ‘alternate’ third base after mining through the gold mineral wall at his natural. GuMiho made the curious decision to stay on 2-base for quite a while, seemingly setting up a committed Marine-Tank push. However, such a push was thwarted before it even got started, as GuMiho was baited into taking some poor fights against SHIN’s Roaches with pure Marines.
The low economy situation persisted as SHIN struggled to keep a fourth base alive on the unusual layout of Crimson Court, while GuMiho took a belated third base. However, the advantage remained with SHIN after GuMiho’s early-game mishaps, and he assembled an overwhelming Roach-Ravager-Bane army that busted through GuMiho’s third base before the defenses were fully solidified.
Game 3 – Site Delta (SHIN win): GuMiho committed to heavy early-game aggression, opening Rax-Fact-CC to attempt a Marine-Hellion Bunker rush at SHIN’s third base. However, GuMiho failed to apply nearly as much pressure as he needed to, and SHIN patiently waited until he had Zergling speed to clean-up the Hellions with barely any issues. SHIN was more than ready for GuMiho’s Banshee follow-up, and GuMiho faced an enormous economic deficit after all of his early investments went bust.
The rest of the game was pretty much a snowball sequence for SHIN, while GuMiho went for turtle mech and prayed for a miracle. There was a moment of false hope when SHIN took a bad fight with poorly supported Brood Lords against Thors, but his economic advantage was too great for it to really matter in the end.
Decider Match: Stats 2 – 0 SHIN
Game 1 – Site Delta (Stats win): Stats went for an Oracle opener while SHIN cut Drones at 21 for a round of Speedlings to try and disrupt Stats’ economy. Despite Stats losing 12 Probes after getting caught off guard, the situation ended up being surprisingly playable for Stats once he killed off a few Drones with his Oracles. After a brief stop at Spire for light Mutalisks harassment, SHIN moved on to Hive for Lurkers and Hydras. Meanwhile, Stats took up a defensive stance, teching up to Storm and eventually Carriers on four bases.
Stats seemed like he might be in trouble when SHIN’s Lurker tech came online, as he only had Storm and Gateway units on defense. However, Stats was able to fight off the first attack thanks to good use of Storm and spreading his units out in a wide arc, buying himself some time before the second wave. SHIN’s erred by not having Overseers along for his next Hydra-Lurker strike, and found himself getting chased off by an unexpected Mothership.
Two successful defenses bought Stats enough breathing room to get Carriers out and assemble his ultimate end-game army. SHIN tried to match Stats by adding Corruptors, but his late-game execution proved to be lacking as he was utterly crushed in the first major engagement and promptly GG’d out.
Game 2 – Ghost River (Stats win): Stats decided to go herO-style in game two, opening with 3 Oracles and fast Blink while omitting a Robotics Facility. Stats’ poor early-game execution would have disappointed herO, as he lost an Oracle and a number of Adepts. However, he did much better in the Blink-Stalker pressure portion of the game plan, tying up RagnaroK on defense while establishing a strong tech and economic base back at home.
Because of this, SHIN ended up being forced to his Lurkers defensively this time around, while Stats teched his way up to Carriers from a much more comfortable position. Desperate to do some damage before the Carriers came online, SHIN rallied his Lurker-Ravager-Ling swarm for a committed frontal attack. However, Stats saw this move coming and started a semi-basetrade on his own terms, giving up his natural while inflicting far more damage on the other side of the map. Ultimately, SHIN couldn’t prevent the Carrier fleet from coming together and surrendered.
- SEO Powered Content & PR Distribution. Get Amplified Today.
- PlatoData.Network Vertical Generative Ai. Empower Yourself. Access Here.
- PlatoAiStream. Web3 Intelligence. Knowledge Amplified. Access Here.
- PlatoESG. Carbon, CleanTech, Energy, Environment, Solar, Waste Management. Access Here.
- PlatoHealth. Biotech and Clinical Trials Intelligence. Access Here.
- Source: https://tl.net/forum/starcraft-2/623468-code-s-ro8-results-ro4-bracket-2024-season-1
- 1
- 11
- 12
- 2024
- 500
- 9
- a
- able
- add
- adding
- advanced
- ADvantage
- advantageous
- after
- again
- Against
- aggressive
- alive
- All
- allowed
- almost
- along
- an
- and
- and tanks
- Another
- any
- apart
- apparent
- apply
- approach
- apr
- ARE
- Army
- around
- arrived
- as
- assembled
- At
- attack
- attacks
- attempt
- attempts
- back
- backdoor
- bad
- base
- Battlefield
- BE
- bear
- became
- because
- before
- behind
- being
- Better
- between
- BIG
- Blink
- block
- blow
- book
- both
- bought
- bracket
- breathing
- bring
- broken
- build
- built
- bust
- Busted
- but
- Buying
- by
- called
- came
- carriers
- catastrophic
- caught
- chaos
- choice
- Classic
- close
- code
- come
- coming
- commenced
- Commit
- committed
- committing
- complete
- completed
- completely
- composition
- concluded
- consolidating
- constant
- content
- continued
- continuing
- conventional
- Core
- could
- couldn
- count
- counter
- CounterAttack
- course
- Court
- cure
- Curious
- Cut
- damage
- dancing
- Dark
- deal
- decided
- deciding
- decision
- Defense
- defenses
- defensive
- Delta
- Den
- despite
- devastating
- DID
- didn
- difference
- difficult
- difficulty
- direct
- directly
- disappointed
- Disrupt
- Disruptors
- do
- down
- downfall
- Drones
- Drop
- drops
- DT
- each
- Early
- Economic
- economy
- Edge
- efficient
- either
- embedded
- end
- ended
- ending
- engagement
- enormous
- enough
- entertaining
- establishing
- even
- eventually
- execution
- expansion
- Face
- faced
- Facility
- factories
- Failed
- failing
- false
- famed
- far
- FAST
- favor
- few
- fight
- Fighting
- fights
- Final
- find
- Fire
- First
- five
- FLEET
- Focus
- focused
- For
- force
- forced
- forces
- forcing
- Fortress
- Fortunately
- found
- Foundation
- four
- Free
- from
- fully
- further
- futile
- game
- GAS
- gateway
- Get
- getting
- GG
- Ghost
- Giving
- go
- going
- Gold
- golden
- good
- got
- gradual
- grand
- grand finals
- great
- Ground
- Group
- guaranteed
- guard
- had
- half
- handle
- Handling
- happens
- harassment
- Have
- having
- he
- headed
- heads
- heart
- heavy
- help
- Hero
- him
- himself
- his
- HIT
- Hive
- hold
- Home
- hoops
- hope
- however
- HTTPS
- Hydra
- idea
- in
- Income
- inflict
- initial
- initially
- Initiative
- instantly
- into
- Investments
- Is
- issues
- IT
- jump
- just
- keep
- kept
- Key
- kill
- killing
- lacking
- last
- late
- launch
- layout
- lead
- least
- leaving
- Led
- left
- less
- light
- like
- Line
- longer
- looked
- looking
- Lords
- lose
- losing
- loss
- lost
- Low
- Macro
- made
- main
- major
- Majority
- make
- MAKES
- managed
- many
- map
- Maps
- mark
- mass
- Match
- matching
- matter
- May
- meaningful
- Meanwhile
- might
- mine
- mineral
- Mining
- miracle
- miss
- missed
- mix
- moment
- Momentum
- more
- most
- mostly
- move
- moved
- movement
- movements
- moving
- much
- narrow
- Natural
- nearly
- needed
- nevertheless
- New
- newly
- Next
- no
- not
- now
- number
- of
- off
- offensive
- often
- Old
- on
- once
- One
- online
- only
- open
- opened
- opening
- Opportunity
- or
- oracle
- Other
- otherwise
- out
- over
- overwhelming
- own
- passed
- Passive
- patiently
- perfectly
- performance
- Picked
- place
- plan
- plato
- plato data intelligence
- platodata
- platogaming
- play
- played
- player
- players
- Playing
- Plenty
- poor
- portion
- position
- positioning
- post
- prepared
- pressure
- pretty
- prevent
- previous
- probe
- Produced
- promptly
- proper
- proved
- pulling
- pure
- push
- pushed
- quick
- quickly
- quietly
- quite
- Ragnarok
- rally
- rather
- Raven
- reactor
- Ready
- really
- Recover
- Relocated
- remained
- replenish
- research
- resource
- Resources
- respective
- responded
- REST
- result
- Results
- Risk
- river
- robotics
- room
- round
- rush
- s
- same
- saw
- scenario
- School
- season
- Season 1
- second
- see
- seemed
- seemingly
- seizing
- sending
- sequence
- setting
- settling
- several
- shield
- showdown
- showed
- side
- similar
- since
- single
- site
- situation
- Skin
- sky
- small
- solid
- solidifying
- some
- sometimes
- speed
- splitting
- Spot
- stabilize
- STALKER
- stance
- start
- started
- stats
- stay
- steady
- still
- stop
- Storm
- straight
- Strategy
- strike
- strong
- style
- subsequent
- succeed
- successful
- such
- superior
- supply
- support
- Supported
- surprisingly
- swarm
- Switch
- tactics
- tailored
- taken
- taking
- tank
- tech
- terms
- territory
- test
- tested
- than
- thanks
- that
- The
- The Game
- The Initiative
- their
- Them
- then
- there
- they
- things
- third
- this
- Through
- time
- times
- to
- together
- Ton
- too
- took
- transition
- transitioning
- tried
- try
- turn
- turned
- turning
- two
- typical
- ultimate
- ultimately
- unable
- under
- unexpected
- units
- until
- unusual
- up
- upgrade
- upgraded
- use
- using
- very
- View
- Vikings
- vintage
- vs
- Wall
- was
- wasn
- Wave
- way
- we
- well
- went
- were
- when
- where
- while
- why
- wide
- will
- win
- window
- winners
- winning
- with
- without
- won
- Woods
- Work
- worked
- would
- yet
- Youth
- youtube
- zephyrnet


![SC2 5.0.13 Patch Release Notes [03/26/2024]](https://platogaming.com/wp-content/uploads/2024/03/sc2-5-0-13-patch-release-notes-03-26-2024.png)