Deep in Baldurs Gate 3’s Shadow-Cursed Lands, you’ll find the Thorm Mausoleum and the Gauntlet of Shar inside. Heading there is part of several quests including “Find Ketheric Thorm’s Relic,” “Find the Nightsong,” “Kill Raphael’s Old Enemy,” “Lift the Shadow Curse,” and Shadowheart’s “The Chosen of Shar” companion quest. All of those quests, though, require you to complete The Gauntlet of Shar, and reaching it requires you to get past the first puzzle: Touching an Umbral Gem on the top floors.
Once you’re past that hurdle, our Baldur’s Gate 3 Gauntlet of Shar guide will walk you through the steps of the Gauntlet of Shar including meeting Balthazar, finding the Silent Library and the Spear of Night, completing the Soft-Step, Self-Same, and Faith-Leap Trials, Finding the Nightsong and Keheric Thorm’s Relic, and completing the Chosen of Shar companion quest.
Meet Balthazar
Once you’re past the Umbral Gem puzzle, you’ll head a little deeper into the Thorm Mausoleum. Go up the stairs on the west side of the Umbral Gem room, and then use the mushrooms to jump your way farther along.
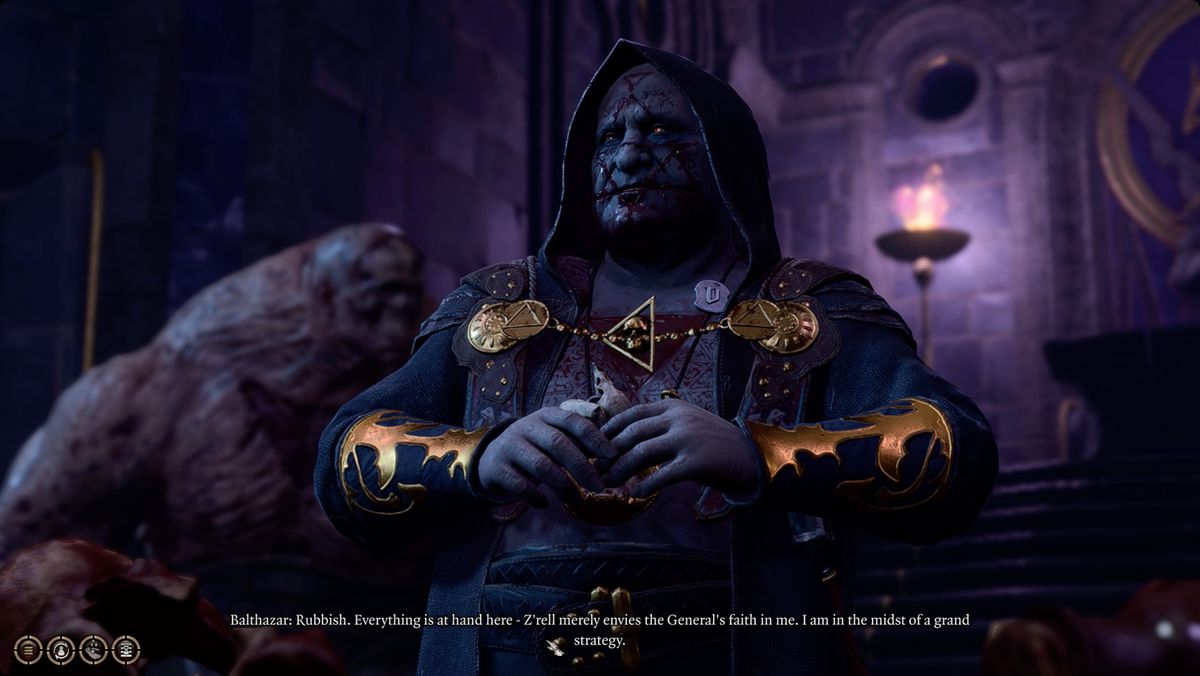
Eventually, you’ll come to a room full of Balthazar’s undead servants. Wipe them out, and the door to Balthazar’s lab will open. Talking to him will give you some more context about Ketheric’s Relic (but not much). You can side with him, kill him, or just ignore him entirely.
Head east to find your way to the next level of the Gauntlet of Shar.
The Gauntlet of Shar
The Gauntlet of Shar is ultimately about collecting a total of four (more) Umbral Gems that you will place in two pedestals. You’ll collect the gems from the trials and from a devil — Raphael’s Old Enemy.
You can do the trials (and the other quests) in any order you want, so we’ll just go in the order you reach them.
Soft-Step Trial
The first trial you reach is the Soft-Step Trial. Your goal is to pass through it without getting spotted by the patrolling Shadows. A Druid with Wildshape has a bit of an advantage when hiding, but even better is just casting Invisibility on someone. Just make sure they can pick locks.
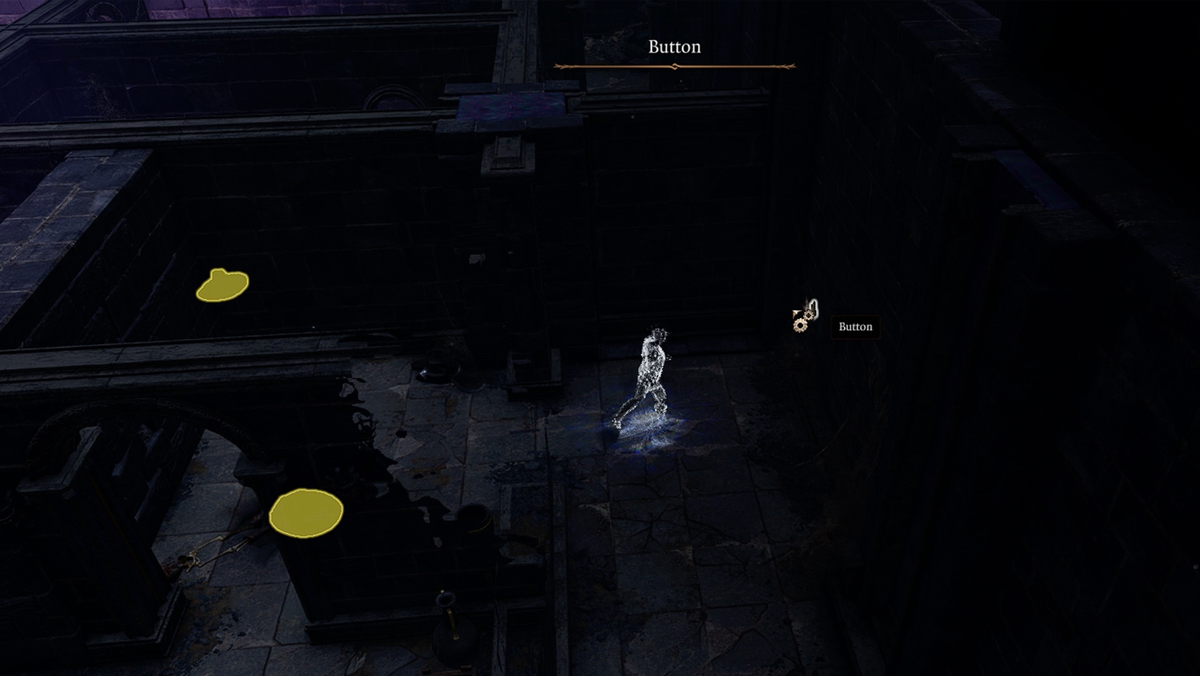
Split someone off from your party, and make sure they are hiding; even when invisible, hiding makes you quieter. Take the rightmost (northern) door, and follow the wall straight forward. You’ll come to a button on the wall to your right. Push it, and continue forward. Pick the lock on the gate, and then grab the Umbral Gem.
Self-Same Trial
Just north of the Soft-Step Trial, you’ll find the Self-Same Trial. This one is the most straightforward: You’ll have to defeat yourself (well, yourselves). Specifically, you have to defeat copies of the four members of your party. The drawback is they have the same abilities.
When all four are defeated, grab the Umbral Gem from the ground where the last mirror-version fell.
Faith-Leap Trial
Outside of the Self-Same Trial, head north again and down the stairs. At the bottom, you’ll find a door to the Faith-Leap Trial.
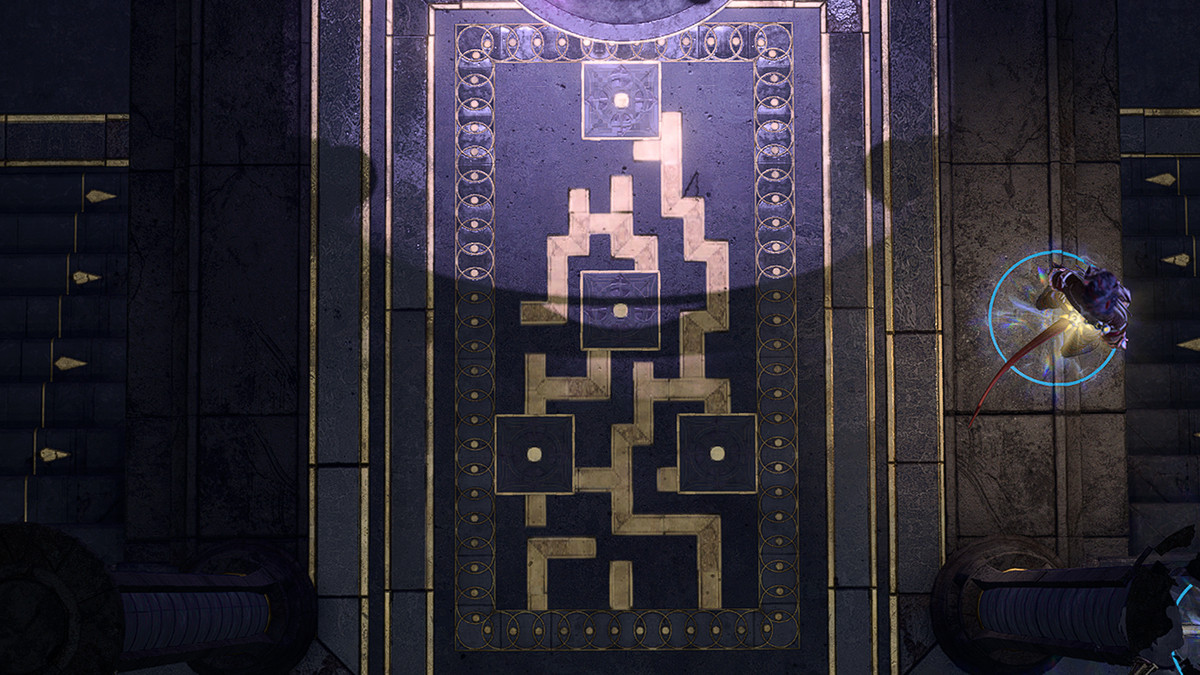
This one is less about literal leaping, and more about a leap of faith (in the Indiana Jones and the Last Crusade sense). At the altar, switch the camera to Tactical View with O. The tiled pattern in the floor is a map of invisible paths you can walk to reach the other side.
Split someone off from your party, and lead them along the route to the far side and claim your Umbral Gem.
The Silent Library and the Spear of Night
The next door to the south is the Silent Library — so named because there’s a object called The Librarian in the center of the room casting Silence over the entire room. That means you can’t cast any spells inside.
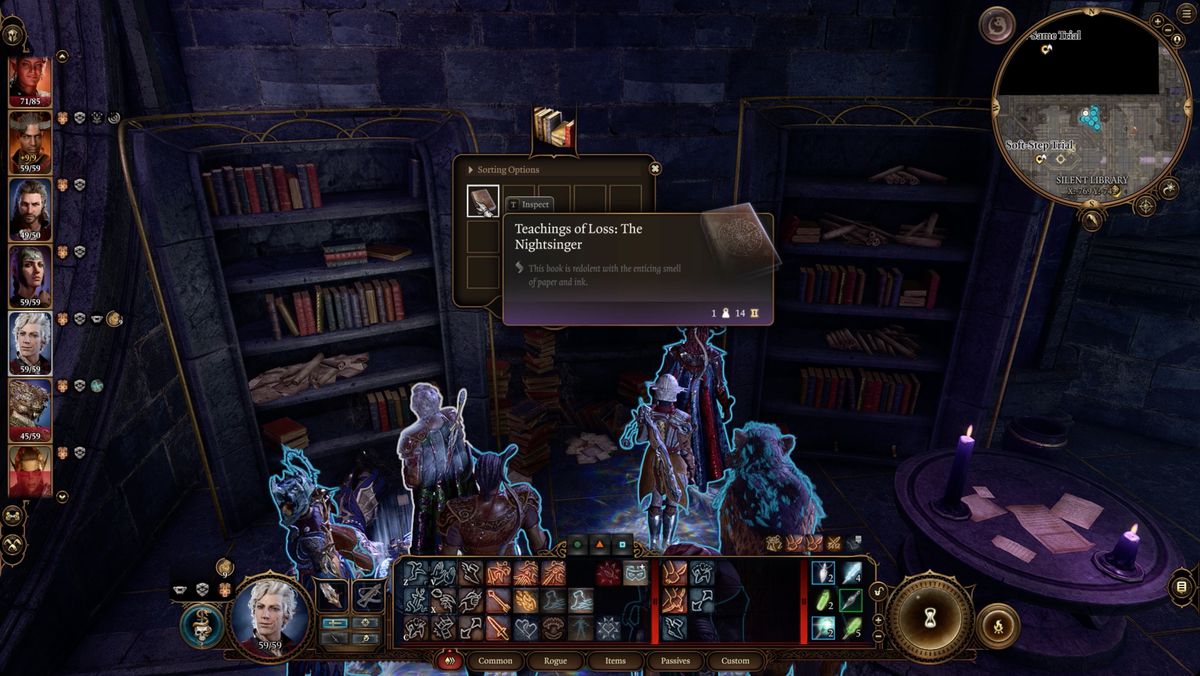
Clear out all the baddies inside — including The Librarian so you can cast spells again — and then start poking around. You’ll find a lot of traps, a few spell scrolls, and some books that describe the trials, but the most important item you’re after is a book called Teachings of Loss: The Nightsinger. You’ll find it in the northeast corner of the library on a trapped bookshelf.
Head to the west side of the library and lockpick the door there — it’s DC 21, so you’ll need a good Sleight of Hand skill to get past it. Inside, you’ll find a pedestal called the Riddle of the Night that asks for an item. Place the Teachings of Loss: The Nightsinger book inside to open a secret door.
Go through and grab the Spear of Night.
Raphael’s Old Enemy, AKA Yurgir
You still need one more Umbral Gem before you can complete the Gauntlet of Shar. Back on the top floor, head all the way east. You’ll spot a Displacer Beast down some broken stairs to the north. Hop everyone across the gap in the stairs and follow the Displacer Beast as it leads you to the east.
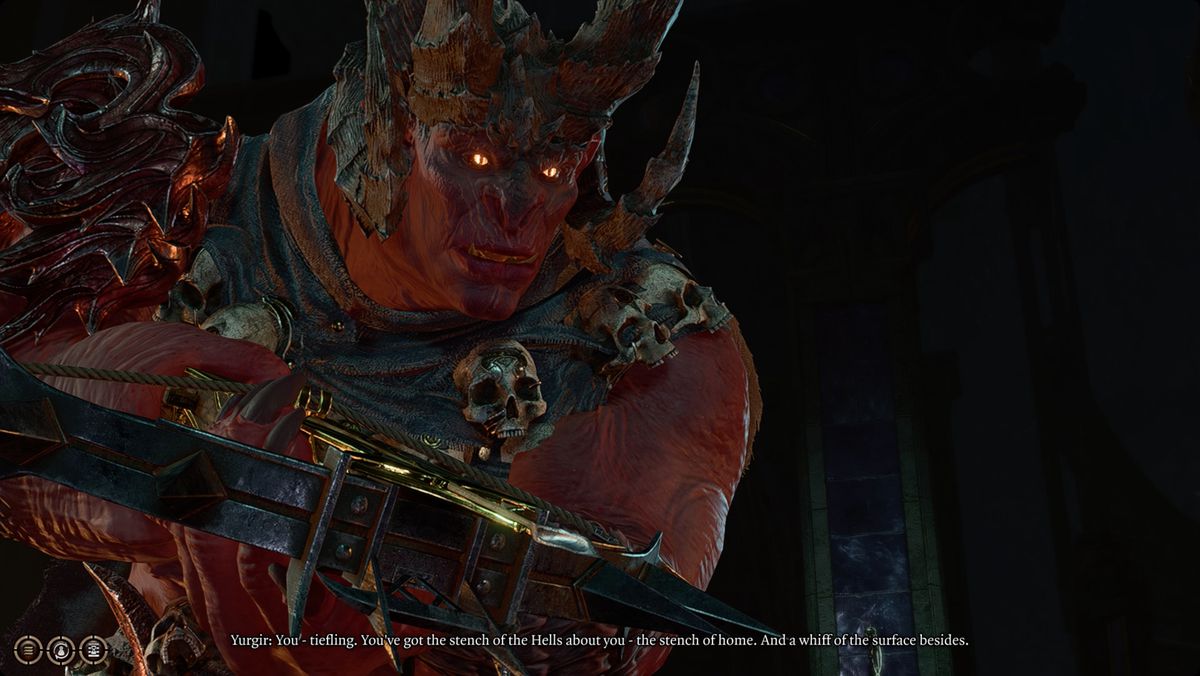
In the room it leads you to, you’ll meet Yurgir the Orthon (a kind of devil). This is Raphael’s Old Enemy from the quest of the same name. There are a few ways to end the quest; you can kill him (and his lackeys), or talk to him to find a loophole in his demonic contract.
However you handle it, you’ll collect the final Umbral Gem from him.
Find the Nightsong
Head back to the pedestal and place one of the Umbral Gems in the altar. This will unlock a platform that will take you deeper into the Gauntlet.
At the bottom, you’ll find another pedestal and altar. Place the remaining three Umbral Gems, and a door will open. Inside, you’ll find the Verge of the Shadows waypoint and a portal to the Shadowfell.
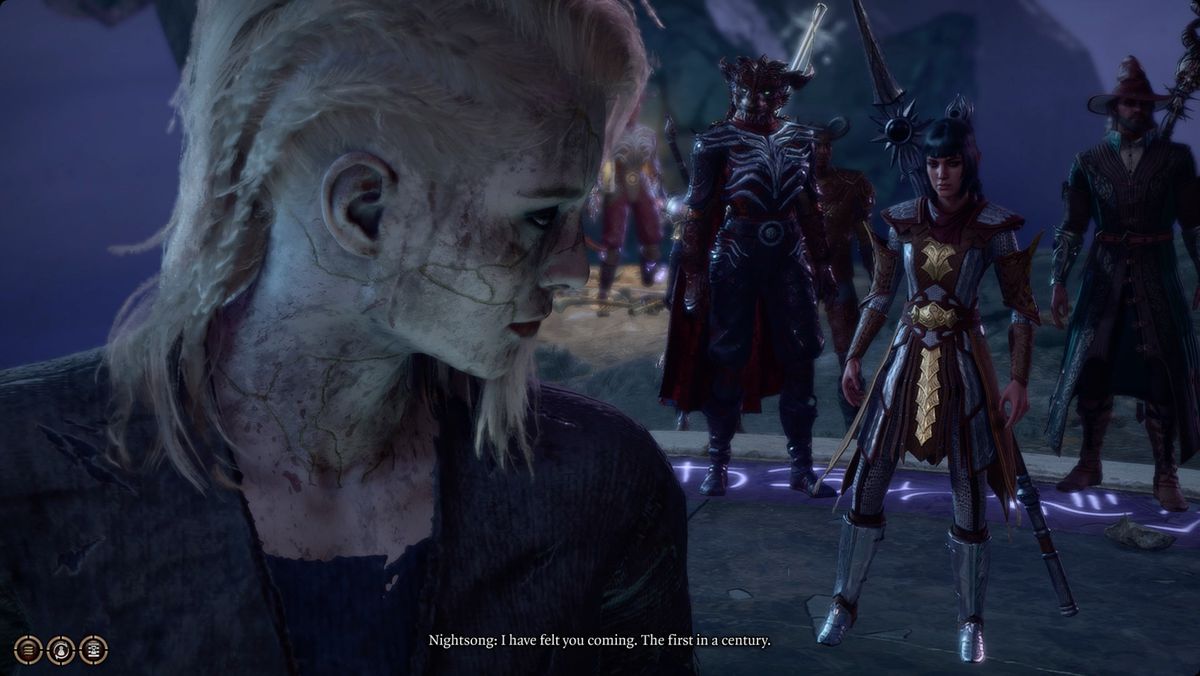
Through the portal, use the low gravity to jump all the way down to the bottom. There, you’ll meet Ketheric’s Relic — the Nightsong. However the interaction plays out, you’ll receive the Moonlight Glaive as a reward and finally understand Ketheric Thorm’s immortality. It will also complete Shadowheart’s “Chosen of Shar” companion quest.
For more information on the classes in Baldur’s Gate 3, consult our overviews on the Barbarian, Bard, Cleric, Druid, Fighter, Monk, Paladin, Ranger, Rogue, Sorcerer, Warlock, and Wizard classes. If you’re stumped by the choice, consult our guide on what class to start with.
- SEO Powered Content & PR Distribution. Get Amplified Today.
- PlatoData.Network Vertical Generative Ai. Empower Yourself. Access Here.
- PlatoAiStream. Web3 Intelligence. Knowledge Amplified. Access Here.
- PlatoESG. Automotive / EVs, Carbon, CleanTech, Energy, Environment, Solar, Waste Management. Access Here.
- PlatoHealth. Biotech and Clinical Trials Intelligence. Access Here.
- ChartPrime. Elevate your Trading Game with ChartPrime. Access Here.
- BlockOffsets. Modernizing Environmental Offset Ownership. Access Here.
- Source: https://www.polygon.com/baldurs-gate-3-guides/23834599/gauntlet-of-shar-walkthrough-bg3-thorm-mausoleum
- a
- abilities
- About
- across
- ADvantage
- after
- again
- Aka
- All
- along
- also
- an
- and
- Another
- any
- ARE
- around
- as
- At
- back
- baldur’s gate 3
- because
- before
- Better
- Bit
- book
- Books
- bottom
- broken
- but
- button
- by
- called
- CAN
- casting
- Center
- choice
- chosen
- claim
- class
- classes
- collect
- Collecting
- come
- companion
- complete
- completing
- context
- continue
- contract
- copies
- corner
- curse
- dc
- deeper
- do
- door
- down
- East
- end
- entire
- entirely
- even
- everyone
- faith
- far
- few
- Final
- Finally
- find
- finding
- First
- floor
- floors
- follow
- For
- Forward
- four
- from
- full
- Gaming
- gap
- gem
- Get
- getting
- give
- go
- goal
- good
- grab
- gravity
- Ground
- guide
- handle
- has
- Have
- head
- heading
- him
- his
- How
- How To
- however
- HTTPS
- if
- Immortality
- important
- in
- Including
- information
- INSIDE
- interaction
- into
- Is
- IT
- jones
- jpg
- jump
- just
- kind
- Larian Studios
- last
- lead
- leads
- Leap
- less
- Level
- Library
- Little
- little deeper
- Locks
- loophole
- loss
- lot
- Low
- make
- MAKES
- map
- means
- meet
- Meeting
- Members
- more
- most
- much
- name
- named
- navigate
- need
- Next
- Night
- North
- not
- of
- off
- Old
- on
- One
- open
- or
- order
- Other
- our
- out
- over
- part
- Party
- pass
- Past
- Pattern
- pick
- place
- platform
- plato
- plato data intelligence
- platodata
- platogaming
- plays
- Polygon
- Portal
- push
- Puzzle
- quest
- quests
- reach
- reaching
- receive
- remaining
- require
- requires
- reward
- right
- room
- Route
- same
- Secret
- sense
- servants
- several
- Shadow
- side
- skill
- So
- some
- someone
- South
- Spear
- specifically
- Spot
- start
- Steps
- still
- straight
- straightforward
- sure
- Switch
- tactical
- Take
- talk
- talking
- that
- The
- The Gap
- Them
- then
- there
- they
- this
- those
- though
- three
- Through
- to
- top
- total
- trial
- trials
- two
- ultimately
- undead
- Understand
- unlock
- up
- use
- using
- via
- View
- walk
- Wall
- want
- way
- ways
- well
- West
- when
- where
- will
- wipe
- with
- without
- you
- your
- yourself
- zephyrnet