After the first two quests in Starfield, you’ll gain access to three main missions at once, one of which is the mysterious sounding “Into the Unknown.” If you came here from our guide on which quests to pick first, you’ll see why we recommend you do this one first in a sec.
In this Starfield guide, we’ll walk you through all the quest steps for “Into the Unknown” — including “follow distortions on the scanner”, which has appeared to be bugged for some players — and help you navigate the game’s bizarre take on procedurally generated planets.
How to fix “Into the Unknown’s” bugs
Some players have reported a number of bugs with “Into the Unknown”. Here are the only solutions we’ve found after researching both.
“Into the Unknown” isn’t in the quest menu
If you run into the bug where Starfield just doesn’t give you the Into the Unknown quest, for now, you’ll actually need to skip it using console commands.
Unfortunately, that means Xbox players are completely out of luck if they run into this bug. If you find yourself in that situation and you can’t install the game on a nearby PC, you may just need to wait for a patch.
Can’t follow the anomaly

Another bug is that players are sometimes unable to follow the scanner and find the temple with the anomaly inside (which we describe below).
If this bug happens to you, return to orbit and waiting by passing time (just for good measure). Consider shutting the game off and launching it fresh as well, just in case.
When you make to re-land on the planet, be absolutely sure you’re picking the Scanner Anomaly Site. If you land anywhere else by accident, the temple won’t appear on the map and you won’t be able to find it.
The “skip it” fix that we described for the first bug also works for players who are hit with this one, but this mission is very critical to Starfield’s story — especially the end — and we recommend holding off on skipping the mission until Bethesda issues a fix.
Finding the artifacts
“Into the Unknown” introduces to you Vladimir and Andreja, and tasks you with collecting two artifacts.
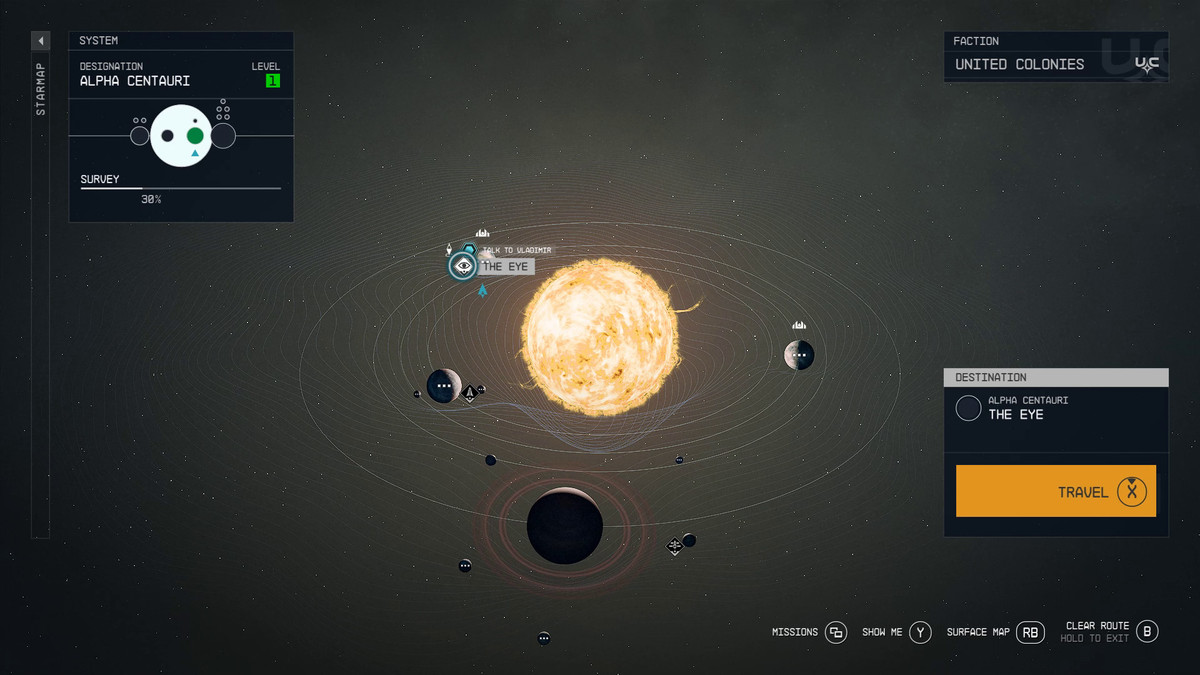
Talk to Vladimir and choose which planet to go to first
To start “Into the Unknown,” zoom out to the Alpha Centauri system map. Right next to New Atlantis, you’ll find a space station called The Eye. Travel there and dock with the station. Once inside, head down the hallway until you meet Vladimir.
Vladimir will tell you he has leads on two different artifacts — a pretty good haul for one main quest. Both of these planets are randomly selected from a pool of potential planets, meaning your quest will differ slightly from ours, but only in which planets you need to travel to on the map. For us, Vladimir served up Piazzi IV-C and Piazzi I.
For this step, you’ll need to help Vladimir find a girl named Andreja, who hasn’t checked in in a while. Unfortunately, we can’t tell you which of your two planets she’s on. Thankfully, it doesn’t matter, as you’ll need to visit both planets before going any further with the quest.
We happened to start with the planet she wasn’t on — Piazzi IV-C. You may experience the following events in a different order.
Go to Piazzi IV-C
We chose to go to Piazzi IV-C first, in the Piazzi system. Land on whatever planet the game wants you to go to and embark. Follow the waypoint to a nearby dungeon, which is where the quest stops being procedurally generated (at least for the moment).
Find the artifact on Piazzi IV-C
Make your way into the cave on your planet and push your way through. We didn’t encounter any enemies on the way to the artifact.
Once you reach the floating caelumite deposits, you know the drill (literally). Pull out your Cutter and aim it at the minerals. Cut away the excess rock and pry the artifact free. You’ll experience another vision here. Once you have the artifact, head back to your ship.
Go to Piazzi I
We chose to go to Piazzi I second, which is the planet where we found Andreja. Land on whatever planet the game tells you to and then hop out of your ship. Follow the waypoint to a nearby cave, which is where the game’s procedural generation ends — at least for this quest.
Find the artifact on Piazzi I // Find Andreja
When you enter the “deep cave,” you’ll immediately know if you’re in the one with Andreja, as you’ll see her killing a guy in close-quarters combat. After a quick chat, she’ll agree to help you find the artifact.
With two companions in tow, make your way through the deep mine, dealing with any Spacers you come across. A quick tip for this mission is to come prepared with a rifle or long-range weapon of some kind. There is a firefight that takes place inside a massive cavern, and you’ll probably be dealing with Spacers from far away.
When you reach the cavern, take out the enemies and either take the stairs (like a chump) or, if you have the Boost Pack Training skill, jump down and stop your momentum right before you smash into the ground.
With the enemies dead and you at the bottom of the cavern, follow the waypoint until you reach another artifact lodged in a wall. Carve it out, as usual, and head back up and out of the cavern.
Add the artifacts to the collection // Talk to Matteo
With both artifacts in-hand and Andreja rescued, return to the Lodge on New Atlantis. Place the new artifacts on the table and then talk to Matteo about your discovery. After a minor argument with other Constellation members, he’ll ask you if you support “dreams” or “science.”
If you side with science you’ll gain reputation with Sarah, Andreja, and some other other Constellation members, depending on who you have around. If you choose dreams, you’ll gain reputation with Matteo. You can also abstain from the choice, which doesn’t give you any rep at all.
Follow distortions on the scanner
You probably expected the quest to end after you deposited the artifacts, like most missions in Starfield. But this time, Vladimir has another task for you.
Talk to Vladimir // Go to Procyon III
Travel up to The Eye again and chat with Vladimir.
Once you reach him, he’ll tell you he wants you to check out an anomaly on the planet Procyon III. Jump in your ship and fly over there.
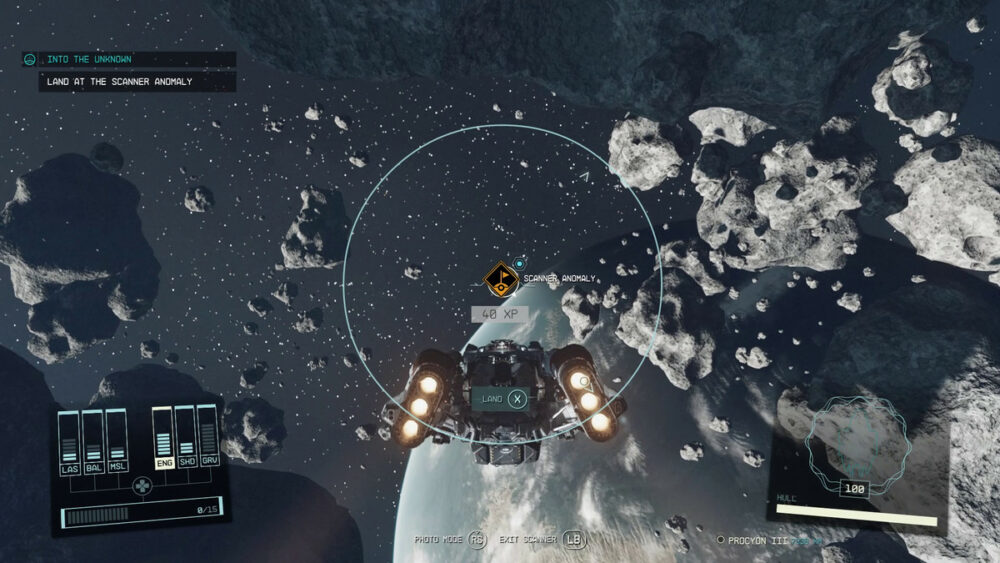
Find the anomaly with the static on the scanner
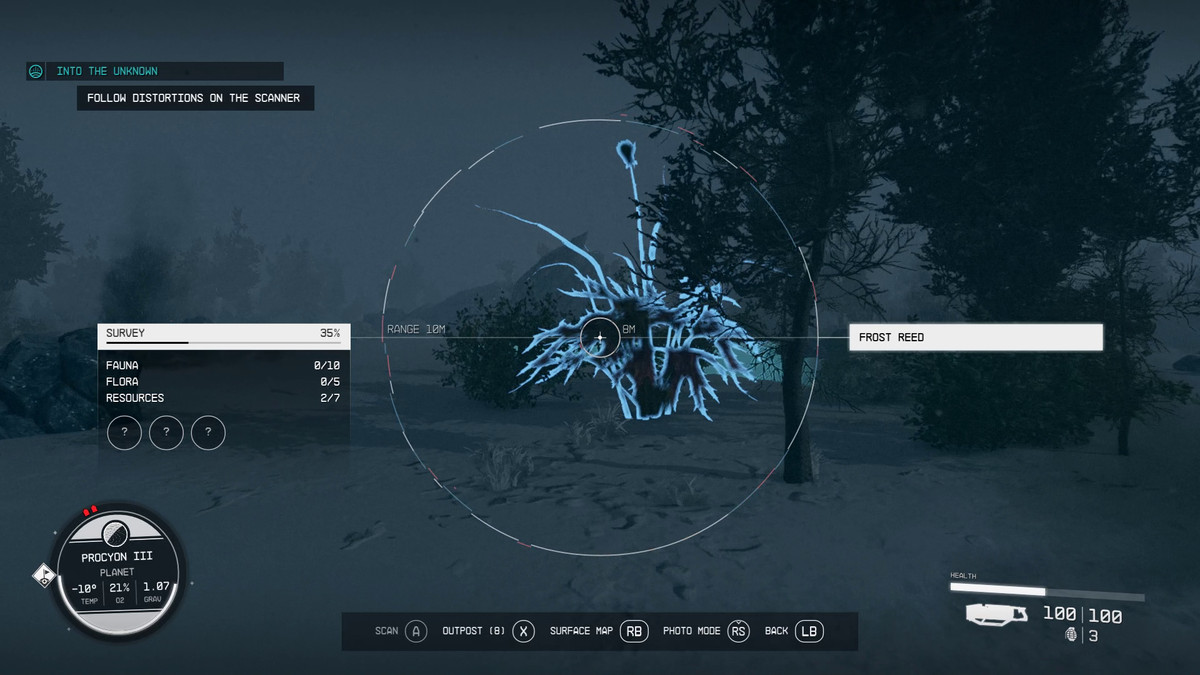
Land at the Scanner Anomaly Site and pull up your scanner. As you look around with your scanner out, you’ll notice some minor distortions around the edges of your UI.
Be warned: these distortions can be very subtle and hard to see, especially on this snowy world, so move slowly at first to make sure you don’t miss it. Walk in the direction where the distortions appear, readjusting yourself and moving in a different direction if the scanner circle stays static for too long.
Follow the static until a waypoint appears. This will take you to Temple Eta. Walk around until you find one of the two doors into the temple. It should be fairly obvious, but you’ll know you’re in the right spot when you see a bunch of glowing rock pillars descend into the floor to reveal a doorway.
Head inside the temple once you can open the door.
Investigate the source of the anomaly
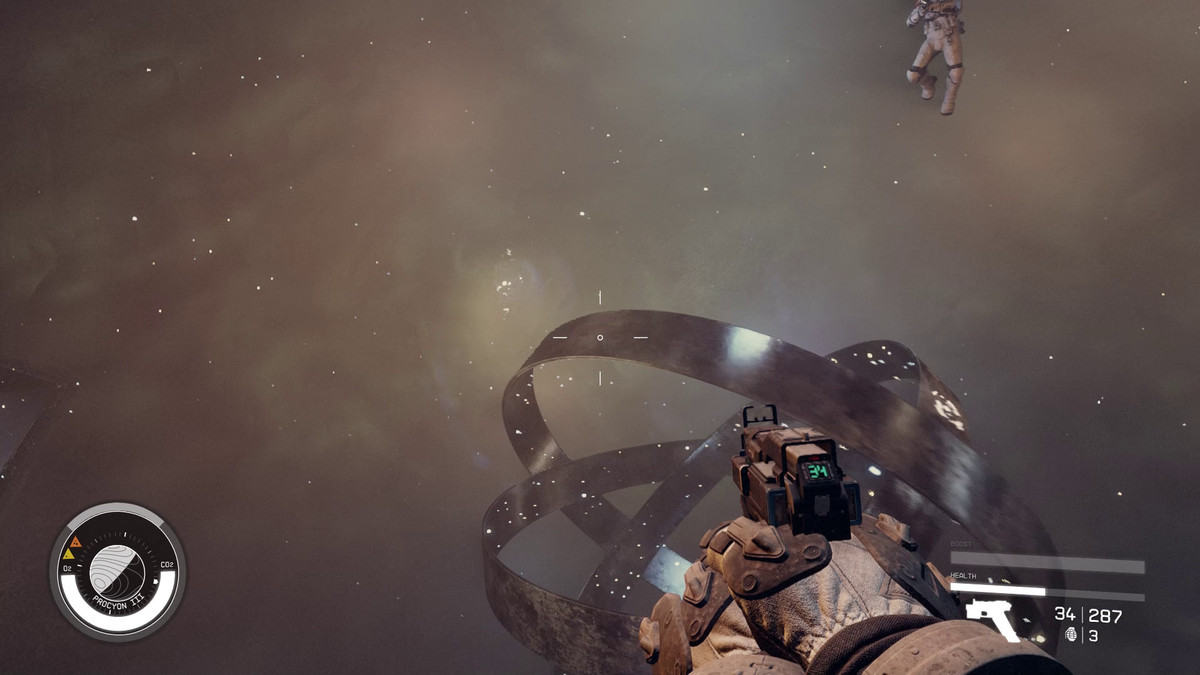
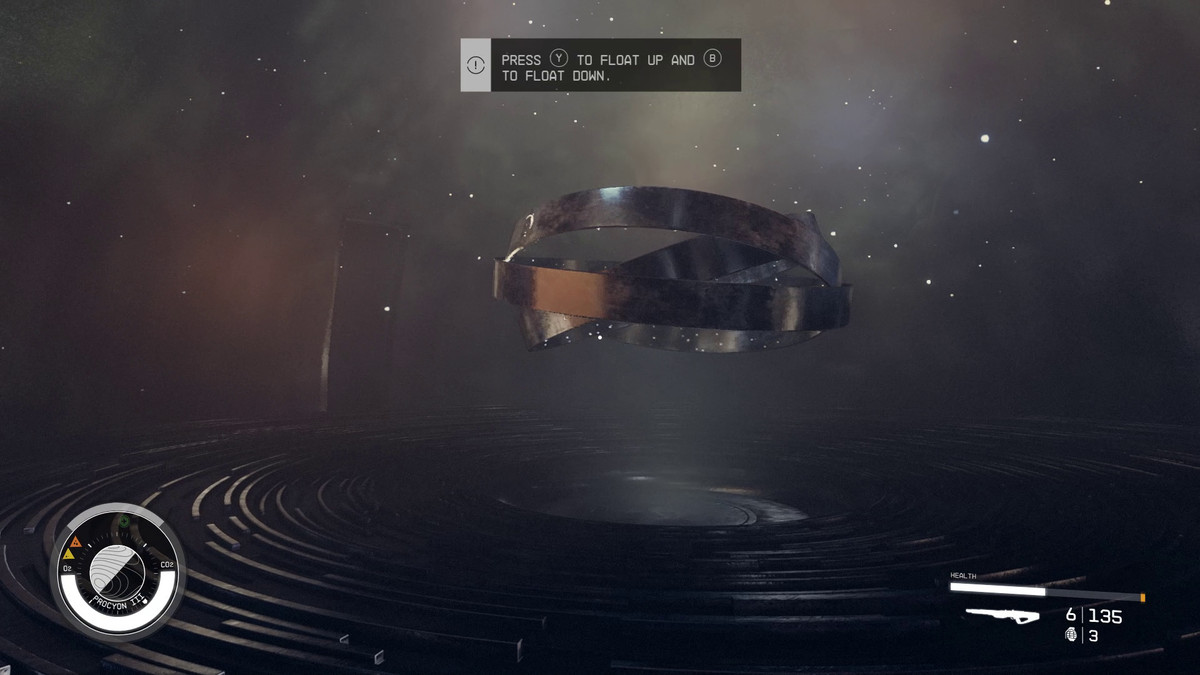
Inside the temple you’ll find yourself in zero gravity, floating around mysterious rings.
How to complete the ring puzzle

This is a very minor puzzle, made confusing by the fact that the game doesn’t actually make it very clear that it’s puzzle-time. If you look around the room with the spinning rings, you’ll find a faint orb made of light. These are our objectives, here’s what you need to do next:
- Hover into the orb of light — you’ll know you did this right because the music will start to swell and the rings will spin
- Locate the next orb of light and fly into it
- Repeat this process several times — we’ve had a few of these puzzles where the game takes way more orbs than previous times to activate, and we’re not sure why
- Once the rings stop, float inside of the rings
Once inside the rings, you’ll be treated to a little cutscene where you get your first power: Anti-Gravity Field.
This power allows you to cause enemies in an area in front of you to stop moving and float, making them easy pickings.
Return to the Lodge // Use ‘Anti-Gravity Field’ in front of Vladimir // Talk to Vladimir
Now that you’re a superhero, jump back in your ship and return to the Lodge. Everyone will think you’re a little strange, claiming that you can lift things with your mind now (and who can blame them). Vladimir will ask you to show off. Oblige him (the game will teach you how to use it using your preferred control method, but it’s both shoulder buttons for controller players). Unfortunately, the members of Constellation will not start floating toward the ceiling like Charlie and Grandpa Joe in Charlie and the Chocolate Factory.
Finish chatting with Vladimir and the rest of the Constellation crew about your new powers to finish the quest.
When you finish “Into the Unknown,” you’ll get a Faction quest for Constellation called “Power from Beyond,” which will take you to a procedurally generated planet to get another power.
If this is the first of the three main quests you’ve finished, you can either explore the galaxy or jump into “The Empty Nest” or “Back to Vectera.” If you did “Into the Unknown” last, like we (regretfully) did, you’ll be able to do the “All That Money Can Buy” main quest.
- SEO Powered Content & PR Distribution. Get Amplified Today.
- PlatoData.Network Vertical Generative Ai. Empower Yourself. Access Here.
- PlatoAiStream. Web3 Intelligence. Knowledge Amplified. Access Here.
- PlatoESG. Automotive / EVs, Carbon, CleanTech, Energy, Environment, Solar, Waste Management. Access Here.
- PlatoHealth. Biotech and Clinical Trials Intelligence. Access Here.
- ChartPrime. Elevate your Trading Game with ChartPrime. Access Here.
- BlockOffsets. Modernizing Environmental Offset Ownership. Access Here.
- Source: https://www.polygon.com/starfield-guide/23842996/into-the-unknown-walkthrough
- a
- able
- About
- absolutely
- access
- across
- actually
- after
- again
- aim
- All
- allows
- also
- an
- and
- Another
- any
- ARE
- AREA
- around
- as
- ask
- At
- Atlantis
- away
- back
- BE
- because
- before
- being
- below
- Bethesda
- beyond
- both
- bottom
- Bug
- bugs
- Bunch
- but
- by
- called
- came
- CAN
- case
- Cause
- Cave
- Charlie
- Chatting
- check
- checked
- choice
- choose
- chose
- Circle
- claiming
- clear
- Collecting
- collection
- combat
- come
- companions
- complete
- completely
- confusing
- Consider
- Control
- controller
- Crew
- critical
- Cut
- dead
- dealing
- deep
- depending
- deposited
- descend
- described
- DID
- differ
- different
- direction
- discovery
- do
- door
- doors
- down
- dreams
- easy
- either
- else
- embark
- end
- ends
- Enter
- especially
- events
- everyone
- excess
- expected
- experience
- explore
- eye
- fact
- far
- few
- find
- finish
- First
- Fix
- floor
- Fly
- follow
- Following
- For
- Free
- from
- front
- further
- gain
- Galaxy
- game
- Gaming
- generated
- generation.
- Get
- give
- go
- going
- good
- gravity
- Ground
- guide
- had
- happened
- happens
- Hard
- has
- Have
- he
- head
- help
- her
- here
- him
- HIT
- holding
- How
- How To
- HTTPS
- i
- if
- image
- immediately
- in
- INSIDE
- install
- into
- Introduces
- Is
- issues
- IT
- joe
- jump
- just
- kind
- know
- Land
- Landing
- last
- launching
- leads
- least
- lies
- light
- like
- Little
- ll
- Long
- Look
- looking
- Luck
- made
- main
- make
- Making
- map
- massive
- matter
- May
- meaning
- means
- measure
- meet
- Members
- Method
- mind
- mine
- minerals
- minor
- Mission
- missions
- moment
- Momentum
- money
- more
- most
- move
- moving
- named
- navigate
- need
- New
- Next
- not
- notice
- now
- number
- objectives
- obvious.
- of
- off
- on
- once
- One
- only
- open
- or
- Orbs
- order
- Other
- our
- ours
- out
- over
- pack
- passing
- Patch
- PC
- pick
- picking
- pillars
- place
- planet
- planets
- plato
- plato data intelligence
- platodata
- platogaming
- player
- players
- Polygon
- pool
- potential
- power
- powers
- prepared
- pretty
- previous
- probably
- push
- Puzzle
- quest
- quests
- quick
- reach
- recommend
- reported
- Reputation
- REST
- return
- reveal
- right
- Ring
- Rock
- room
- Run
- Science
- SEC
- second
- see
- selected
- several
- she
- should
- show
- shows
- side
- site
- situation
- Smash
- So
- Solutions
- some
- source
- Space
- space station
- special
- spinning
- Spot
- Star
- Starfield
- start
- station
- step
- Steps
- stop
- stops
- Story
- superhero
- support
- sure
- system
- table
- Take
- takes
- talk
- task
- tell
- tells
- than
- that
- The
- The Game
- The Source
- Them
- then
- there
- These
- they
- things
- think
- this
- three
- Through
- time
- times
- tip
- to
- too
- toward
- Training
- travel
- two
- ui
- unable
- unfortunately
- unknown
- until
- up
- us
- use
- using
- very
- via
- Visit
- wait
- walk
- walkthrough
- Wall
- wants
- way
- we
- well
- What
- whatever
- when
- where
- while
- WHO
- why
- will
- with
- works
- world
- xbox
- you
- your
- yourself
- zephyrnet
- zoom