So you’ve made it through Pool 1 of Marvel Snap, and found your way into the murky waters of Pool 2. Some of your decks are getting destroyed, while others are adding missing pieces. Which are still worth playing? I’m here to help.
Pool 2 is unlocked at Collection Level 222, lasting through Collection Level 474 (after which you start collecting Pool 3 cards). There are a lot of great cards in Pool 2, from direct counters to popular Pool 1 decks (Killmonger and Shang-Chi) to cards that unlock new play possibilities (Vulture and Jubilee).
I’ve previously gone over the best Pool 1 decks in Marvel Snap. Here are the best Pool 2 decks in Marvel Snap, including some improved versions of prior decks and some brand new mechanics for you to toy around with.
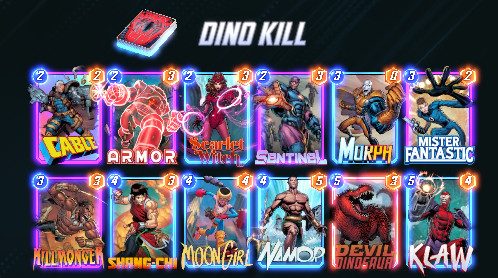
Dino Control
Image: Second Dinner Studios via Polygon
Key cards: Devil Dinosaur, Moon Girl, Shang-Chi
Depending on when you picked them up in Pool 1, Devil Dinosaur and Moon Girl may have been a combination you’ve relied on for quite some time. But there are some key additions in Pool 2 worth considering.
Agent 13 is a decent one-drop, since she’ll add a card to your hand (increasing Dino’s eventual power). The Collector’s another potential addition, since you’ll likely have a good amount of cards in your Dino deck that add cards from outside your deck, which will buff The Collector. But the two I went for are Killlmonger and Shang-Chi, for an extra level of Control.
Killmonger is the best counter to Kazoo decks in the game. By eliminating all one-costs, you can thwart a Kazoo player’s plans (and if you wait until turn six, like I like to, it’s a real tilter).
Shang-Chi, who destroys all enemy cards with nine or greater power at the location he is played at when revealed, is the best Devil Dino counter in the game. It’s worth holding one in your own Devil Dino deck because of how often you’ll come across other Dino players in Pool 2. It’s also useful against other powerful four- and five-drop cards like Namor and Warpath.
How do you play around the likelihood your opponent is holding a Shang-Chi as well? You can wait to play your Dino until turn six, decreasing the chances Shang-Chi can destroy your big power card, or you can play the Armor card and put the Devil Dino in that spot. This is also why I do not have a six-energy card in this deck.
My other cards in this deck are a mixture of cards that will get me more cards, cards that will get me info on my opponent, and cards that can help me win non-Dino lanes. This is the deck that was by far the most successful for me in Pool 2.
Movement

Image: Second Dinner Studios via Polygon
Key cards: Multiple Man, Vulture, Heimdall
In Pool 1, you got some of the pieces for a movement deck. You probably tried it out at some point, thinking “Hey, this synergy seems neat,” and lost a lot of games.
Good news! In Pool 2, you get the tools you need to actually make this deck work. Cloak, Vision, and Vulture can significantly improve your movement deck (as well as Miles Morales for the Season Pass holders).
The idea with this deck is to buff up Multiple Man or Vulture (or both) as many times as possible by moving them around (ideally to a place where Kraven is) or with Forge and Hulk Buster. Vulture gains five power every time he moves, while Multiple Man creates a duplicate of himself (including any bonus stats) whenever he is moved. Iron Fist, Cloak, Doctor Strange, and Heimdall all provide avenues for you to move your cards, and you’ve got a nice balance here of “cards that move other cards” and “cards that want to be moved.”
One note of caution, for Movement players and Movement opponents alike: Because Heimdal moves all of the player’s cards one location to the left, Movement decks end up favoring the two leftmost locations. Do with that information what you will.
Discard
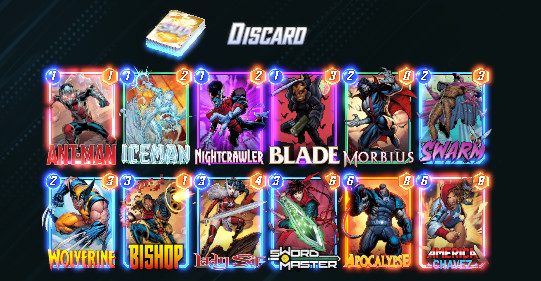
Image: Second Dinner Studios via Polygon
Key cards: Morbius, Lady Sif, Apocalypse
The discard deck relies on buffing up Apocalypse by discarding him as many times as possible. Pool 2 adds a few extra tools to help you win your non-Apocalypse lanes, with Morbius and Swarm as two standout cards.
Morbius gains two power every time you discard a card. It’s a straightforward synergy with the rest of the deck, and one that encourages you to discard as many times as possible. Swarm is another card that wants to be discarded — when you discard Swarm, you get two zero-cost copies of the card.
Another variant on this deck throws in the destroy mechanic (more on that in a second), with cards like Nova, Bucky Barnes, Carnage, and Deathlok. Feel free to experiment with both until you find the one you like.
Destroy

Image: Second Dinner Studios via Polygon
Key cards: Nova, Carnage, Deathlok, Shang-Chi
This deck becomes a lot better once you get to Pool 3 and can add cards like Death, but the Pool 2 version of it is a fun anti-meta variant that allows you to mess with your opponents and have a fun time doing it.
The crucial Pool 2 additions here are Bucky Barnes (who turns into the six-power Winter Soldier when destroyed), Killmonger, Shang-Chi, Hobgoblin, and Sabretooth. Hobgoblin is one of the most irritating cards to play against in the game — he has negative-eight power and, on reveal, moves to the other side of the board. I’ve added Professor X for a bit of location lockdown, but the general idea is pretty straightforward: You want to destroy your cheap cards with Carnage or Deathlok, and destroy their important cards with Killmonger or Shang-Chi.
Kazoo

Image: Second Dinner Studios via Polygon
Key cards: Ebony Maw, Ant-Man, Armor, Ka-Zar
The “Kazoo” decks, a loving nickname for decks based around Ka-Zar and the one-cost cards he buffs, are the most consistent in Pool 1. With the addition of Killmonger, opponents have more counterplay options against Kazoo decks, but they are still powerful.
Ebony Maw is a great one-cost addition to this deck. As a seven-power, one-cost card, he’s very powerful, but prevents you from playing any more cards at that location. Don’t panic — if you draw well, you can simply play him last in that location and not worry about it. Keep in mind you can not play Ebony Maw after turn three, however.
Another crucial addition here is Armor. Armor is not a necessary card in Pool 1 Kazoo decks. But with the abundance of Killmonger cards in Pool 2, it is absolutely crucial to have one in your Kazoo deck at this point.
There is also another Kazoo variant built around the four-cost Sandman, which slows the pace of the game in later turns by only allowing each player to play one card per turn. The idea is you start the game with a flurry of cheap cards, and then slow it down before your opponent can respond. I have not had much success with this version, but you should feel free to give it a shot.
Jubilee

Image: Second Dinner Studios via Polygon
Key cards: Domino, Jubilee, all the six-costs your heart desires
This one’s a little more out there, and difficult to execute, but it is fun and gets a whole lot more fun in Pool 3 (so you can get some practice in now). Jubilee is one of the more exciting cards in Pool 2, playing a random card from your deck at this location. If you stack your deck right, that means you can play a powerful card for free.
I have Sunspot in here because there is a decent chance you might have to skip some turns with the unbalanced energy curve of this deck, but you could also go with Quicksilver instead for a more straightforward approach (and a guaranteed one-drop). The ideal play pattern: Sunspot on turn one, Domino on turn two, Storm on turn three if there’s a bad location (or pass), and then Jubilee on turn four. If that’s how the game starts, you are in great shape: Jubilee will play another powerful card alongside her for free, and then you only have powerful cards remaining.
If you don’t draw Jubilee in time … well, you’re kind of out of luck. But if things go your way, you can beat just about any deck.
