Destiny 2: Season of Plunder is all about pirates, and what’s more pirate-like than finding a riddle hidden in a bottle? Well that’s the gist behind Season of Plunder’s new Treasure Beacon quests, which will take you on a riddle-filled adventure around the Sol system.
In this Destiny 2 guide, we’ll teach you how to get the Treasure Beacons and how to solve each of the game’s three riddle quests, starting with Cryptic Quatrains 1.
How to unlock Treasure Beacons
All three Treasure Beacons come from the Rank Rewards menu in the Star Chart at the HELM. You’ll need to level your Savvy — the seasonal reputation — all the way up to level 16 to unlock all three beacons.
Here are the Savvy levels you’ll need for each Beacon:
- Small Treasure Beacon – Rank 7
- Medium Treasure Beacon – Rank 10
- Large Treasure Beacon – Rank 16
To increase your Savvy, play the new Ketchcrash and Expedition activities.
Small Treasure Beacon – Cryptic Quatrains 1
Image: Bungie via Polygon
At Savvy Rank 7, you’ll be able to pick up the Small Treasure Beacon from the Star Chart, which will give you the Cryptic Quatrains 1 quest. You’ll need to solve four different “riddles” to find the buried treasure, which is the first half of a new Treasure Map for your Captain’s Atlas.
Step 1
The first Cryptic Quatrains 1 riddle reads thus:
“My story begins as I hide from the crews / They search and will find me unless I hide soon / I’ll wait on the nightfall, the cleverest ruse / And force them to hunt by the light of the moon.”
The actual riddle here is fun, but not particularly helpful. Focus instead on the orange letters in the quest text (which we’ve bolded above), which will give you the real message:
“Begin search on Moon”
All you need to do for this riddle is to land on the Moon. Go to your director and land by Eris.
Step 2
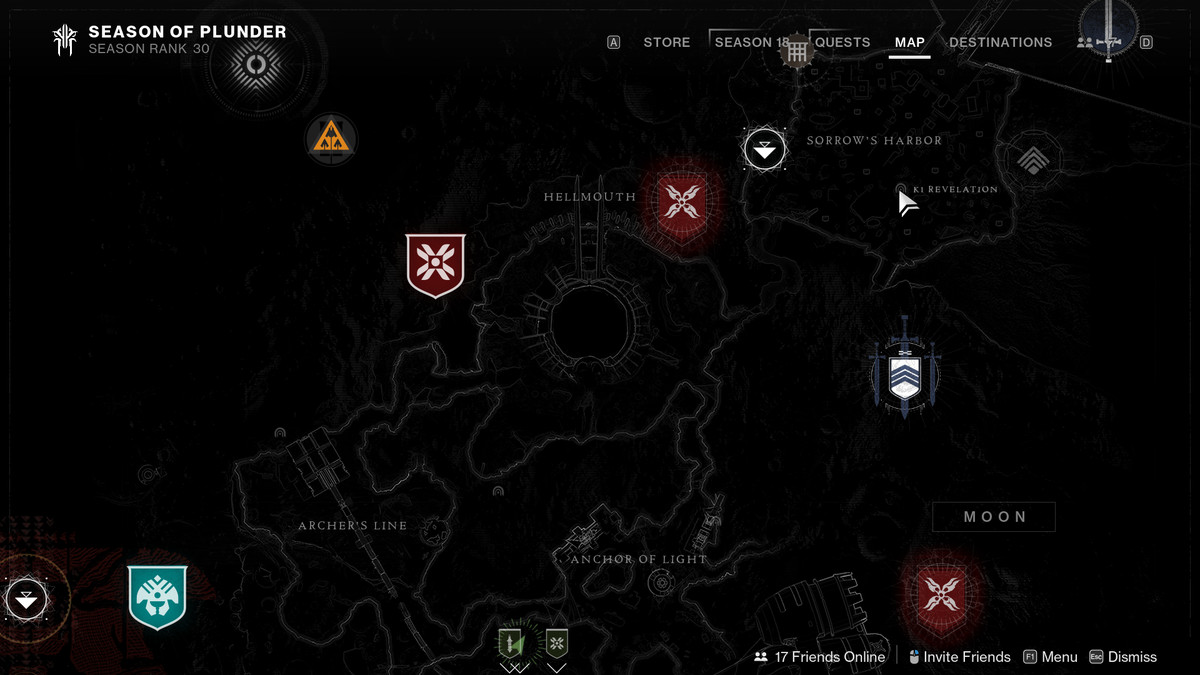
Image: Bungie via Polygon
The second Cryptic Quatrains 1 riddle reads thus:
“Behind in the harbor, their sorrow was real / They lost what I’d taken, me heart filled with fear / From cruel revelation the dawn would reveal: / A chest, broke and barren, and me nowhere near”
Following just the orange text, the message reads:
“Harbor Sorrow lost revelation chest”
The answer to this riddle is inside the K1 Revelation Lost Sector in Sorrow’s Harbor on the Moon. Teleport over there and run through the Lost Sector. When you open the chest, the final piece of the puzzle, you’ll solve the riddle.
Step 3
The third Cryptic Quatrains 1 riddle reads thus:
“My eyes toward the cosmos, I let out a sob / I begged to the gods and the fallen alike / By bullet or saber, I’d fall to the mob / But please, let me deal them a palpable strike”
Following just the orange text, the message reads:
“Cosmo Fallen Saber Strike”
Go to the Cosmodrome and select the Fallen S.A.B.E.R. Strike node on the far right side of the map. Complete the Strike to answer the riddle and get the final step.
Step 4
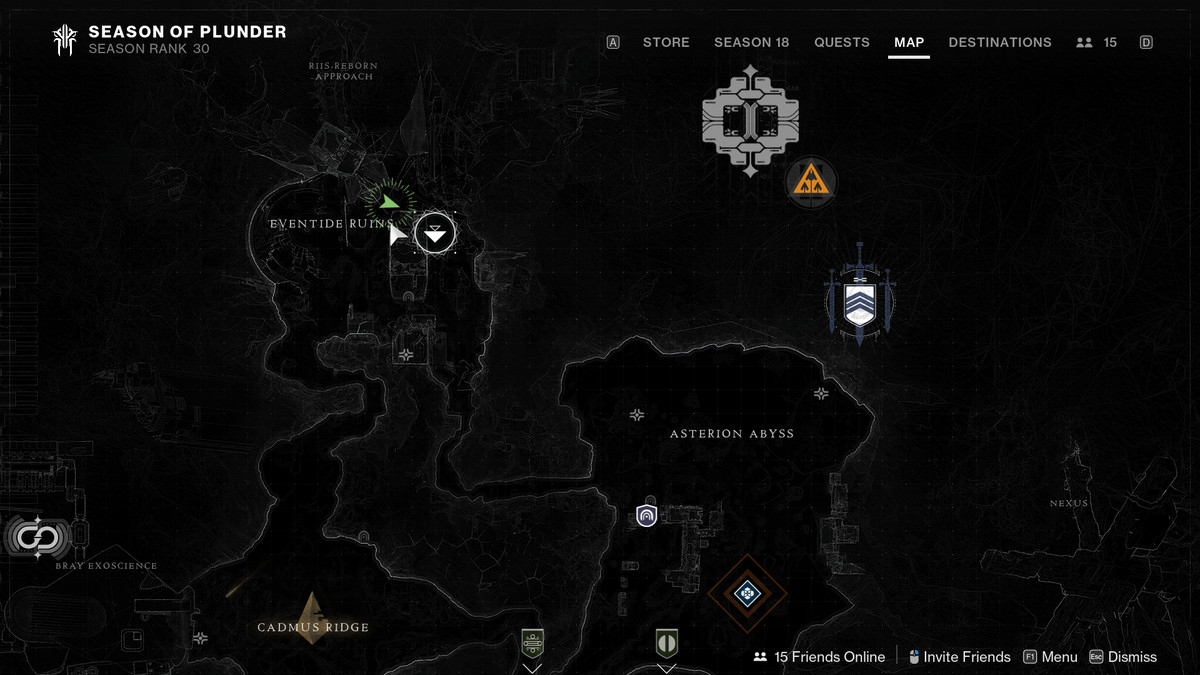
Image: Bungie via Polygon
The fourth Cryptic Quatrains 1 riddle reads thus:
“The winds of Europa were frozen and white / And even the tides had been stopped by the cold / The hook would swing empty, I’d not die tonight / By cranes they’d be searchin’, but I’d keep me gold”
Following just the orange text, the message reads:
“Europa Eventide hook cranes search”
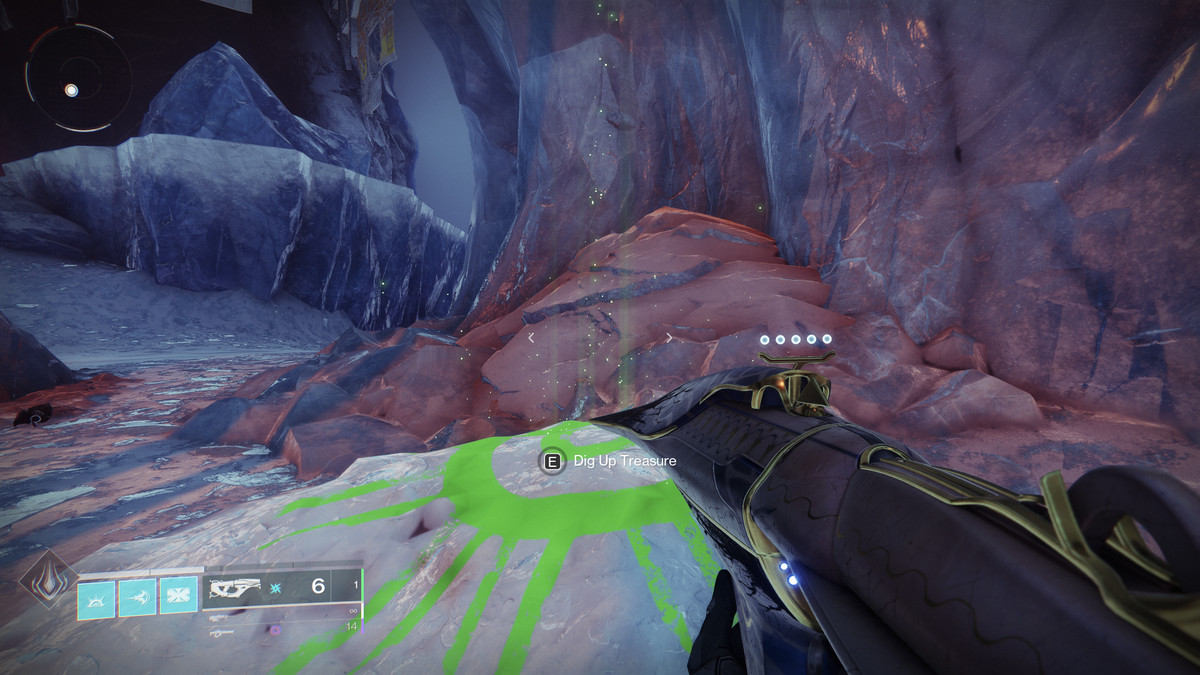
Image: Bungie via Polygon
Go to Eventide Ruins on Europa. When you land, walk forward to the open area where several cranes sit above a patch of snow — this is the arena where the Servitor public event occasionally spawns.
On the ground, in the snow, you’ll see a green X next to some rocks. Dig up the treasure and you’ll earn some loot, a few map fragments, and the Crude Cipher Fragment.
Medium Treasure Beacon – Cryptic Quatrains 2
At Savvy rank 10, you’ll be able to pick up the Medium Treasure Beacon from the Star Chart, which will give you Cryptic Quatrains 2. This quest works much the same as the first, except instead of four riddles there are five.
Step 1
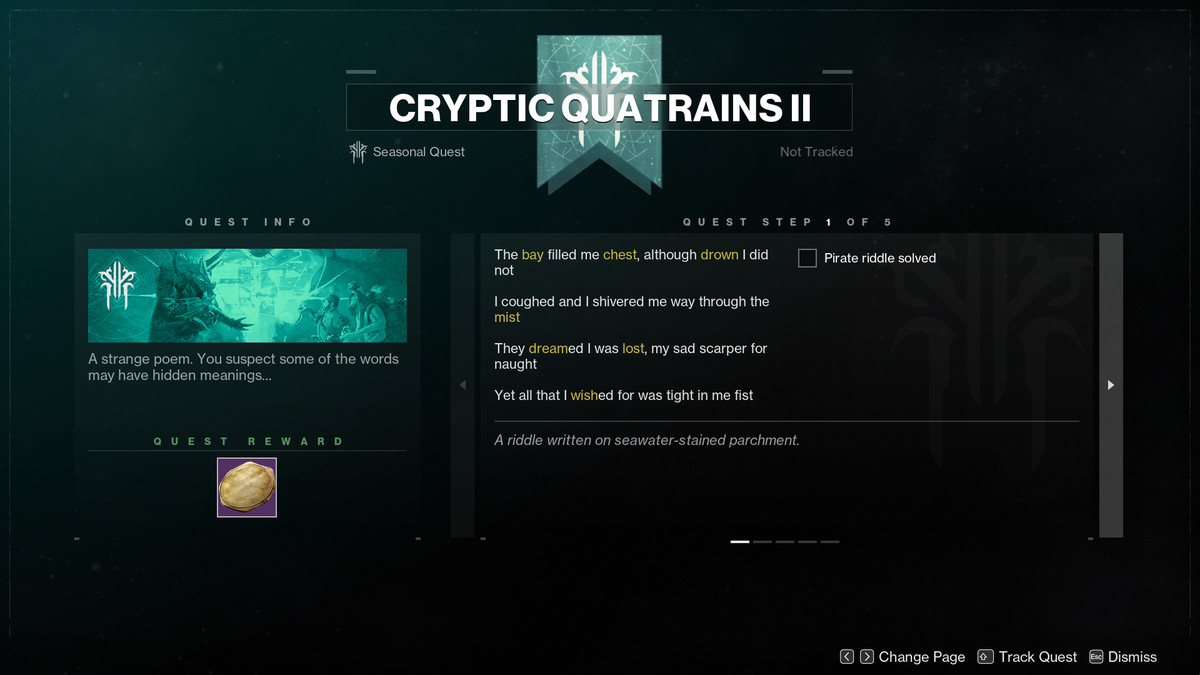
Image: Bungie via Polygon
The first Cryptic Quatrains 2 riddle reads thus:
“The bay filled me chest, although drown I did not / I coughed and shivered me way through the mist / They dreamed I was lost, my sad scarper for naught / Yet all that I wished for was tight in me fist”
Following just the orange text, the message reads:
“Bay chest drown mist dream lost wish”
Go to the Dreaming City and land in the Divalian Mists. Turn around and enter the Bay of Drowned Wishes Lost Sector. Complete it and loot the chest to get the next riddle.
Step 2
The second Cryptic Quatrains 2 riddle reads thus:
“I swore I was dead at the shore of the lake / Their shadows stretched long as they searched the debris / But though they did strike out at me and me take / Their words found me ears, but they didn’t find me”
Following just the orange text, the message reads:
“Dead lake shadows strike”
Open the Director and mouse over to the EDZ. Select the Lake of Shadows Strike on the right side of the screen. Complete the Strike to get the next riddle.
Step 3
The third Cryptic Quatrains 2 riddle reads thus:
“Me long expedition led to no reward / Me bones cried for rest and yet I could not yield / Lest I hear the sound of a crewmate’s drawn sword / I shivered with terror at what they might wield”
Following just the orange text, the message reads:
“Expedition sword wield”
This message isn’t very clear, but what it’s asking you to do is actually extremely simple. Equip a sword in your Heavy slot and go run an Expedition via the playlist in the HELM. You’ll get the next riddle when the mission ends.
Step 4
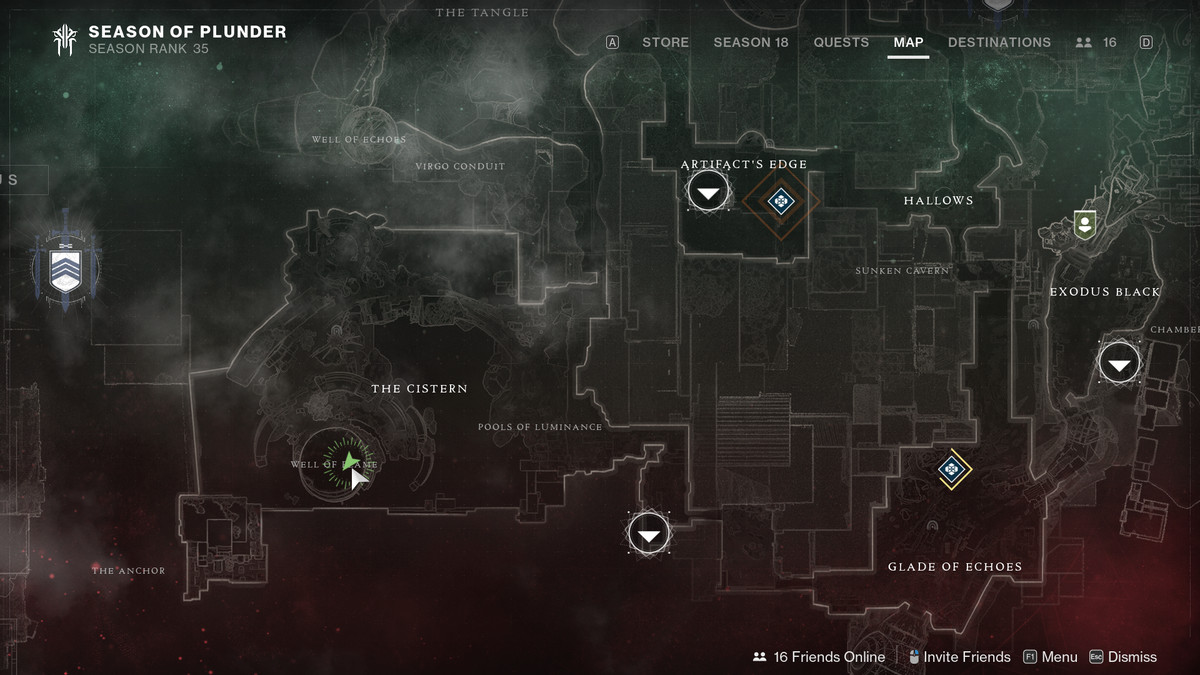
Image: Bungie via Polygon
The fourth Cryptic Quatrains 2 riddle reads thus:
“The red ground of Nessus would soon be me grave / A column reached high into alien hue / Through cistern did beckon, no water it gave / At pyramid’s imprint, I sought to pass through”
Following just the orange text, the message reads:
“Nessus column cistern pyramid’s imprint pass through”
Go to Nessus and land just south of The Cistern, near the Pools of Luminance. Drive into the zone and enter the giant Well of Flame column (there’s a big door on one side). Just inside the door, you’ll find the green X marking a place to dig for treasure. Interact with it. Instead of getting loot, you’ll get the fifth and final riddle.
Step 5
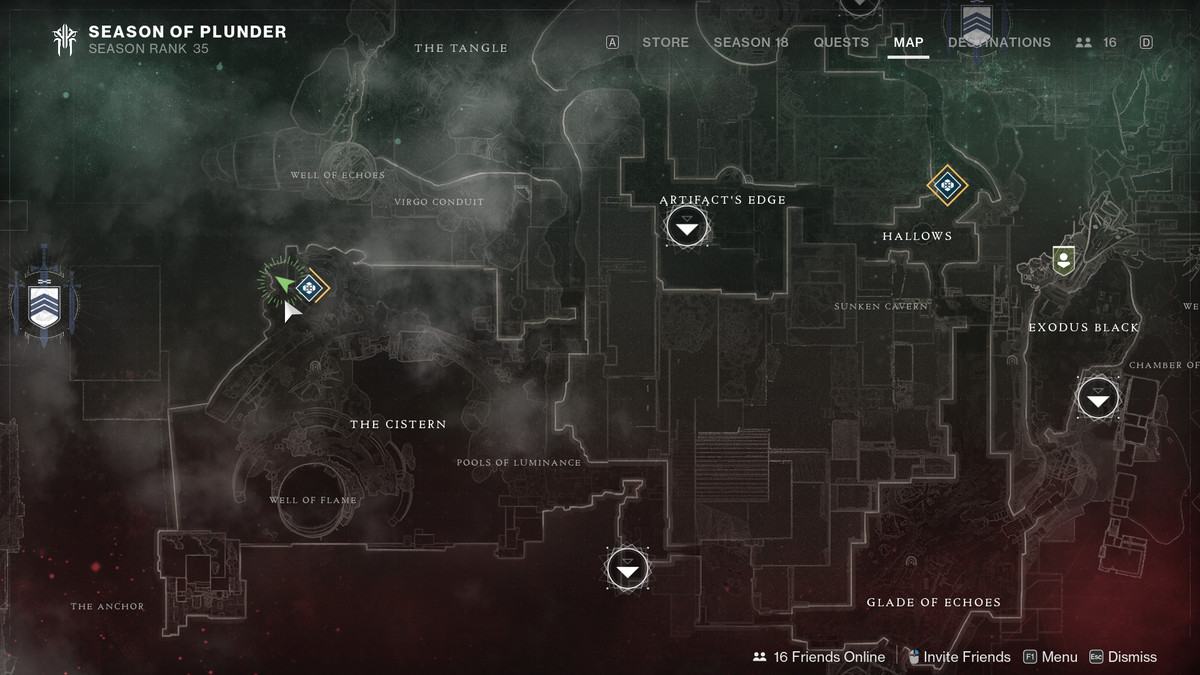
Image: Bungie via Polygon
The fifth Cryptic Quatrains 2 riddle reads thus:
“Me crewmates were nearing, t’was just as I feared / And terrible fluid did fall from the sky / I fancied I noticed, beyond broken sphere / A place that was safe for me treasure and I”
Following just the orange text, the message reads:
“Fluid did fall from the sky broken sphere treasure”
This riddle doesn’t give you a location, which might immediately throw you off. However, the reason you don’t get a location here is that the solution to this riddle is also in The Cistern on Nessus. Exit the Well of Flame and drive your Sparrow to the northwestern part of The Cistern’s map. Stop before you hit the Radiolarian Fluid.
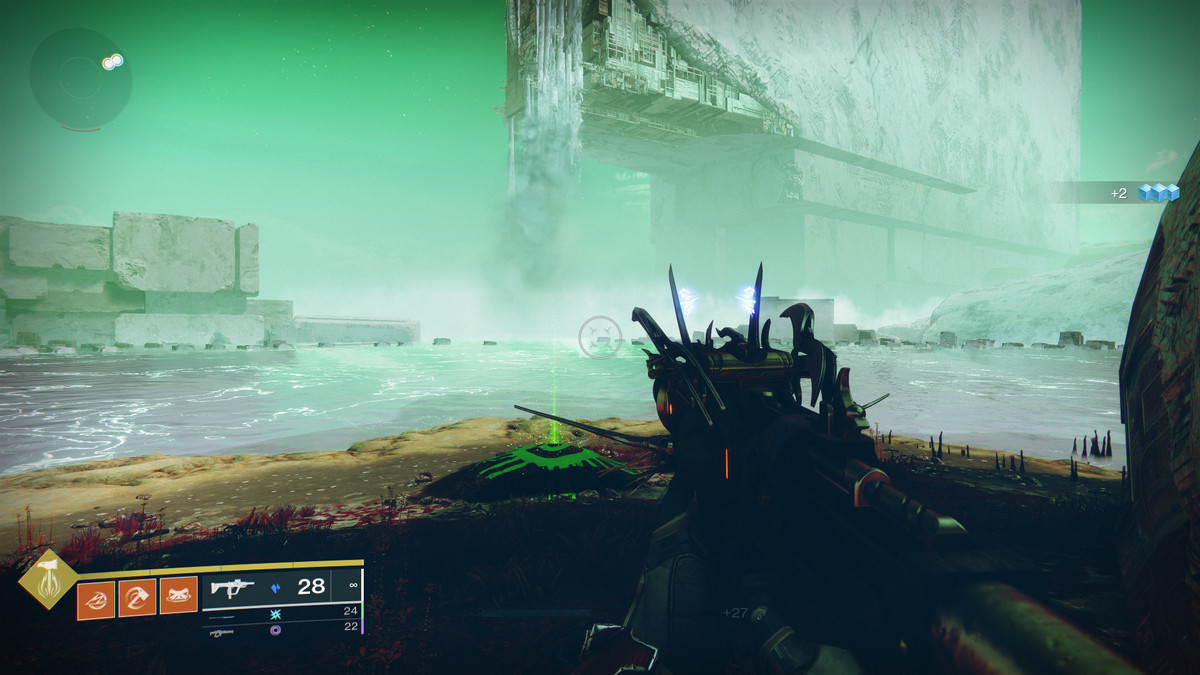
Image: Bungie via Polygon
You should find yourself on a shore, overlooking a giant Radiolarian Fluid waterfall, near where the Cabal Drill public event usually takes place. On the shore, behind a rock, you’ll see the green X that signals buried treasure. Interact with the mound and you’ll get another Crude Cipher Fragment, some Map Fragments, and a few seasonal weapons.
Large Treasure Beacon – Cryptic Quatrains 3
At Savvy rank 16, just before you’re able to reset, you’ll earn the Large Treasure Beacon and the Cryptic Quatrains 3 quest. Like the other two quests, Cryptic Quatrains 3 will send you around the Sol System with a variety of riddles. This is the longest of the three quests, but finishing it will finally net your Exotic reward: a new Sparrow.
Step 1
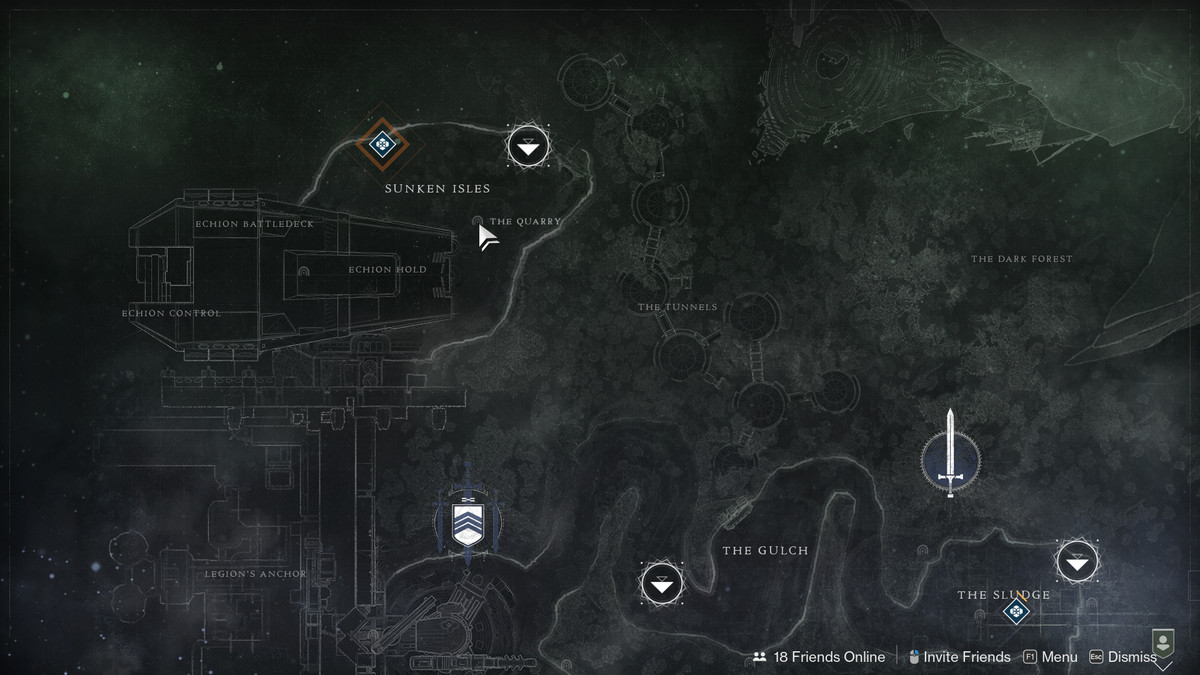
Image: Bungie via Polygon
The first Cryptic Quatrains 3 riddle reads thus:
“…was I still alive? Still not dead, as I dreamed? / Me treasure not sunken, not lost in the deep? / They’d caught not their quarry, I would be redeemed / And bury me knife in their chests while they sleep”
Following just the orange text, the message reads:
“Dead sunken lost quarry chest”
Go to the EDZ and land in the Sunken Isles. Enter The Quarry Lost Sector. Loot the chest to finish this step and pick up the next riddle.
Step 2
The second Cryptic Quatrains 3 riddle reads thus:
“I waded ashore after crashin’ their ship / Me takin’ their treasure they’d never forgive / Me exodus doubtless curled many a lip / I’d make them forget I had one life to live”
Following just the orange text, the message reads:
“Crash exodus one life to live”
For this step, you’ll need to complete the Exodus Crash Strike without dying.
Go to the Director and select Nessus. Look on the northeast side of the map and select the Strike node for Exodus Crash. Run through the Strike as cautiously as you can.
This is easier said than done, as Exodus Crash has numerous traps and exploding enemies who will try to end your flawless run. Put on armor that gets your Resilience stat as high as it can go (100). It’s worth noting that, for Titans, the Lorely Splendor Helm Exotic makes this trivial.
Just be careful and run the Strike until you’re able to finish it without dying. Once you do, you’ll gain the next step in the riddle.
Step 3
The third Cryptic Quatrains 3 riddle reads thus:
“They cursed as their catch crashed away through the trees / I moved as if lightnin’ did arc through me bones / I felt like the maker had answered my pleas / While handy with cannons, they left ‘em back home”
Following just the orange text, the message reads:
“Catch crash lightnin’ did Arc through me bones hand cannon”
All you need to do for this step is run the seasonal Ketchcrash activity while using an Arc subclass and a hand cannon. When you open the chest, you’ll get the next step.
Step 4
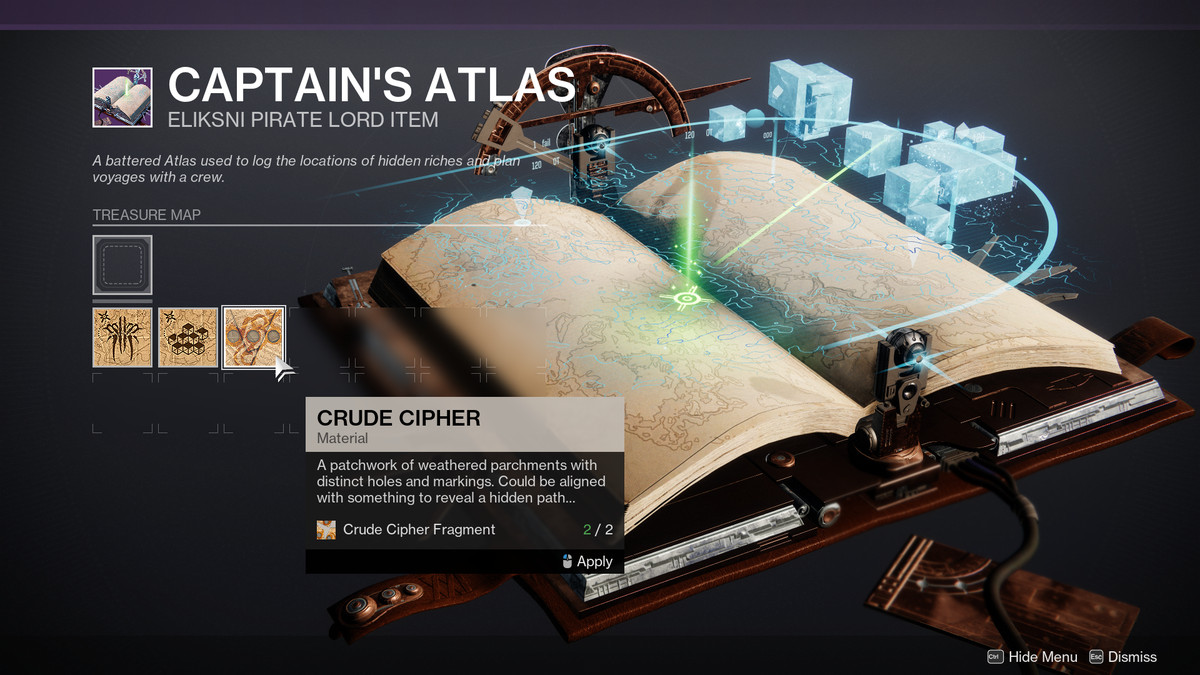
Image: Bungie via Polygon
The fourth Cryptic Quatrains 3 riddle reads thus:
“Alone with me atlas and treasure at last / I use me crude dagger to cut out a code / This cipher I’ll place where it’s held safe and fast / Two beacons will guide you if treasure you’re owed”
Following just the orange text, the message reads:
“Atlas crude cipher two beacons”
This is the quickest step in the entire quest. Open your Captain’s Atlas and hover your cursor over the Treasure Map node. Select the Crude Cipher, which you collected in the previous Cryptic Quatrains quests. Place it into the Captain’s Atlas and you’ll get the next step.
Step 5
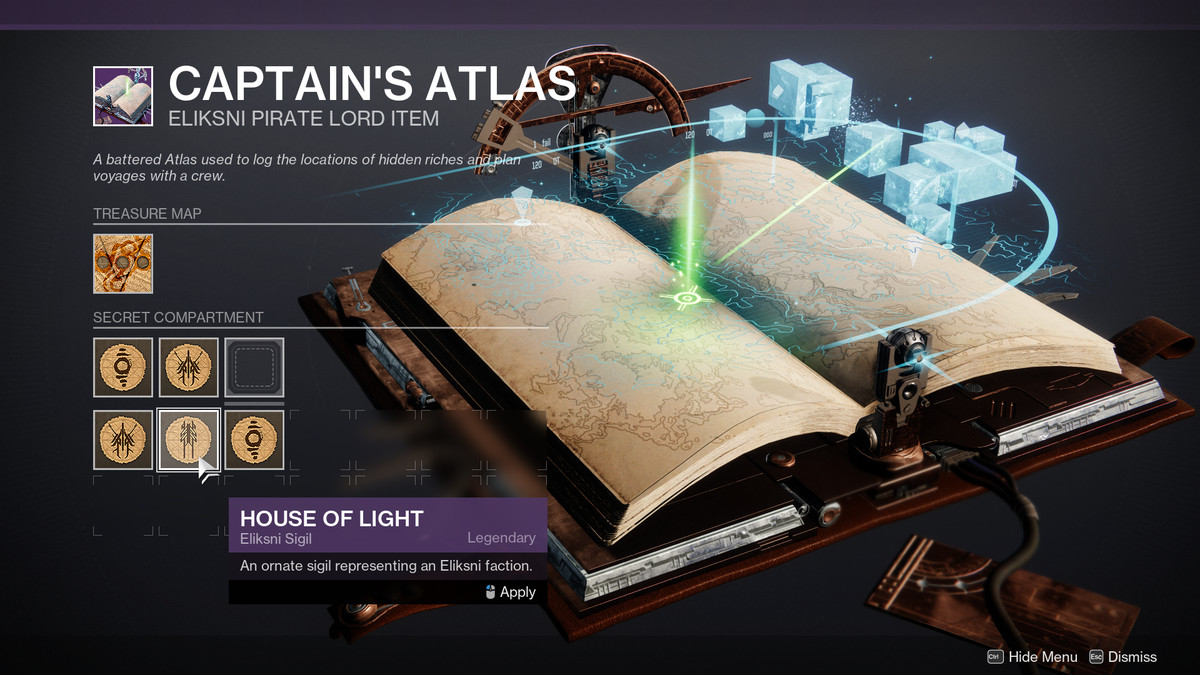
Image: Bungie via Polygon
The fifth Cryptic Quatrains 3 riddle reads thus:
“I crept out at dusk, left me treasure behind / And found me old crew and the captain as well / I’m light with a blade and me right hand’s unkind / They’ll find their salvation dead-center in hell”
Following just the orange text, the message reads:
“Dusk left light right salvation center”
This step features a very quick puzzle. In the Captain’s Atlas, you’ll be able to slot three Fallen icons into three different secret compartments. You’ll need to do this in a specific order reading from left to right.
Here’s the solution:
- Place the House of Dusk Eliksni Sigil in the left compartment
- Place the House of Salvation Eliksni Sigil in the middle compartment
- Place the House of Light Eliksni Sigil in the right compartment
Once you complete the cipher, you’ll gain the next step in the quest.
Step 6
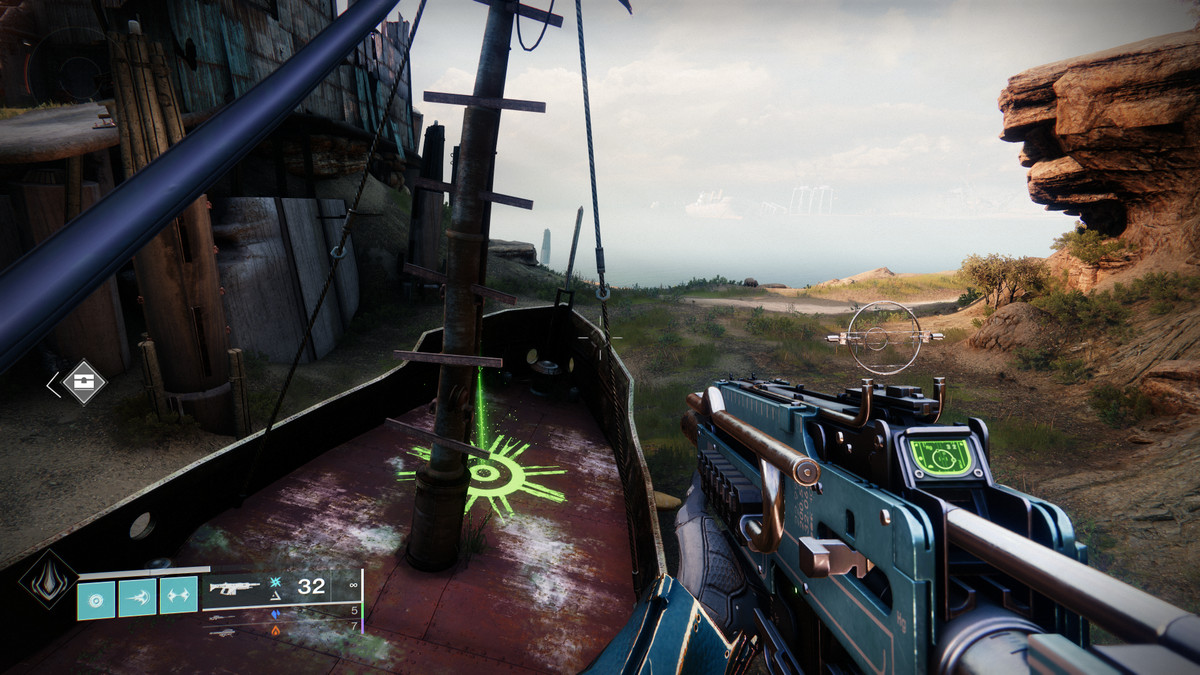
Image: Bungie via Polygon
The sixth Cryptic Quatrains 3 riddle reads thus:
“The cosmos had set me ashore, I was free / Forgotten at last, me heat empty of hate / On deck of the vessel that pointed to sea / I leaned on the mast and awaited me fate”
Following just the orange text, the message reads:
“Cosmo shore forgotten vessel that pointed to sea mast”
Travel to the Cosmodrome and drive over to the Forgotten Shore. Drive to the entrance of the Veles Labyrinth Lost Sector but don’t go inside. Instead, continue southeast on the map until you reach another abandoned ship, which is pointed toward the ocean. Jump on the ship and look under the mast. You’ll see a green marking that denotes treasure. Dig it up and you’ll get the final step of the puzzle.
Step 7
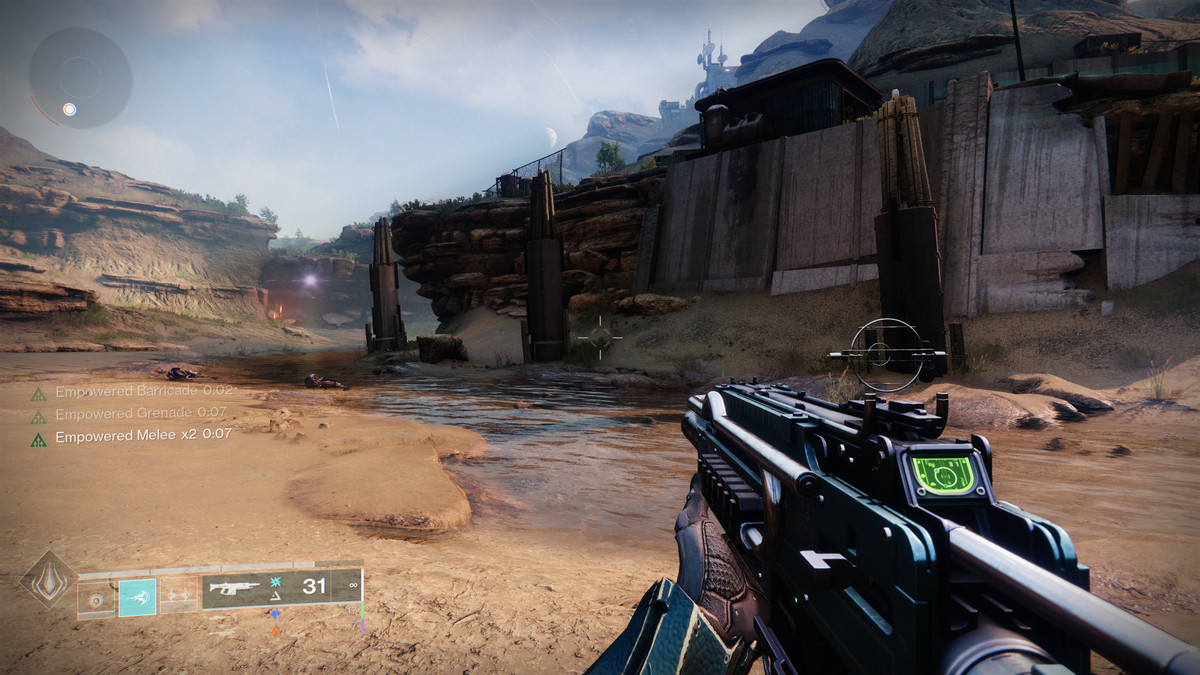
Image: Bungie via Polygon
The seventh Cryptic Quatrains 3 riddle reads thus:
“I took all I had, placed it safe in a cave / Where stream joins its mother by pillars of three / It’s yours if you like, for you’re clever and brave / You may find me treasure… but never find me”
Following just the orange text, the message reads:
“Cave stream joins its mother pillars of three treasure”
This is the hardest to decipher riddle in the entire quest, but the treasure is actually very close to step 6.
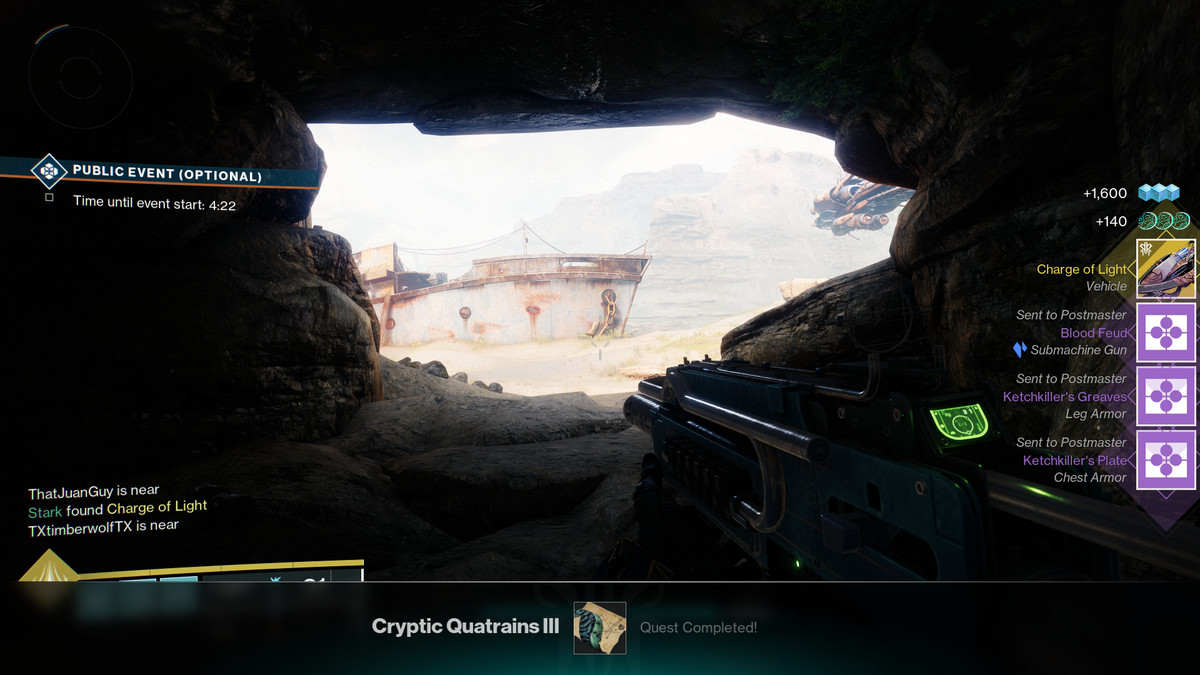
Image: Bungie via Polygon
From where you collected the final clue in the Forgotten Shore, hop back on your Sparrow and drive like you’re going to the Mothyards. On your way, past the giant tankard on the map, you’ll see three old concrete pillars near the cliff wall. And behind the pillars, you’ll see a cave with a green light shining from inside. Go in and dig up the treasure to finally finish your hunt.
For your trouble, you’ll get some seasonal loot and the Exotic Charge of Light pirate Sparrow. You’ll also pick up the Beacon’s Guidance Triumph, which you’ll need to complete the Scallywag seasonal Seal.