Want to know how to scan in Starfield? This is how scanning works in Starfield along with why you won’t always get the full picture with a simple scan.
Starfield is an expansive new RPG from Bethesda, probably their biggest and most ambitious to date. Set in a sprawling sci-fi universe, there are tons of different planets with completely unique contents how there. What if you want to get to grips with what makes up each planet though, that’s where knowing how to scan in Starfield comes in really handy.
If you’ve watched any science fiction in the past, you’ll likely know that the first thing to do before taking your steps onto a new planet is to give it a scan. That’s how you can determine just what it is you’re walking out into. How scanning works in Starfield means you won’t need to do it to determine the safety of a planet, but it is pretty important for optimally assessing resources. It’s a tool that’s useful for everyone, not limited to a background.
Whenever you’re in a new spot, you need to get to grips with everything around you. Much like you’d expect, different planets have completely different sets of resources such as chemicals or other deposits around the landscape. Getting to know what’s on each planet is going to help you get orientated before you land. You can even scan out and survey an entire world to figure out if it’s worth touching down. Saves you quite a bit of time, similar to games like No Man’s Sky. Knowing how to use the scanner in Starfield can pay off quickly.
It’s a basic tool on your ship that can really cut down on the legwork if you know how scanning works in Starfield. This is everything you need to know to fully scan and check out every plant in Starfield.
How to Scan in Starfield on the Surface
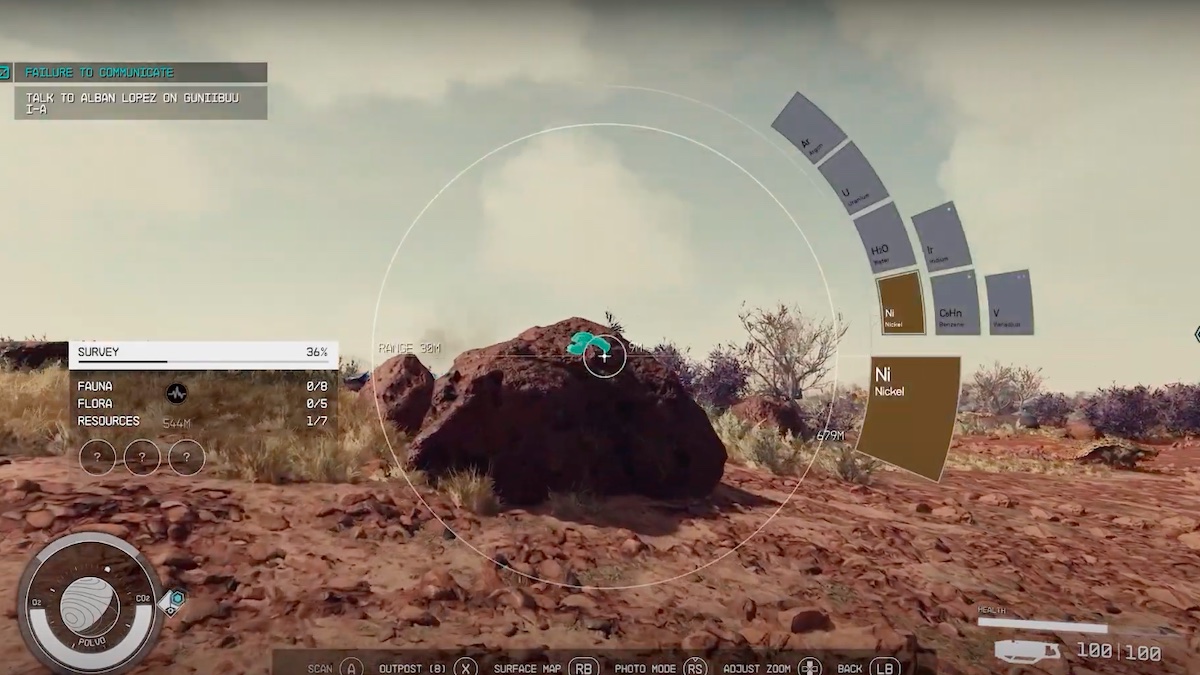
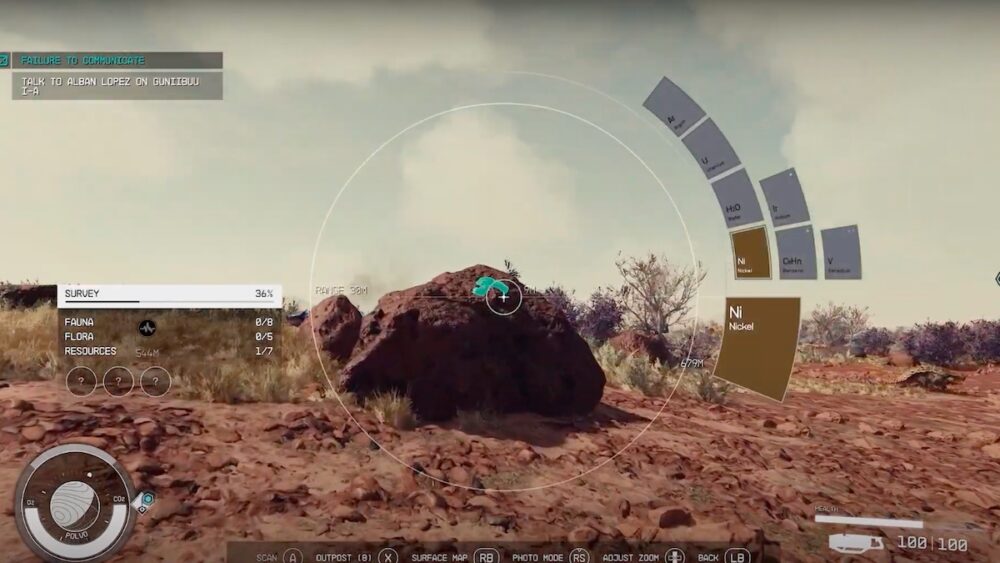
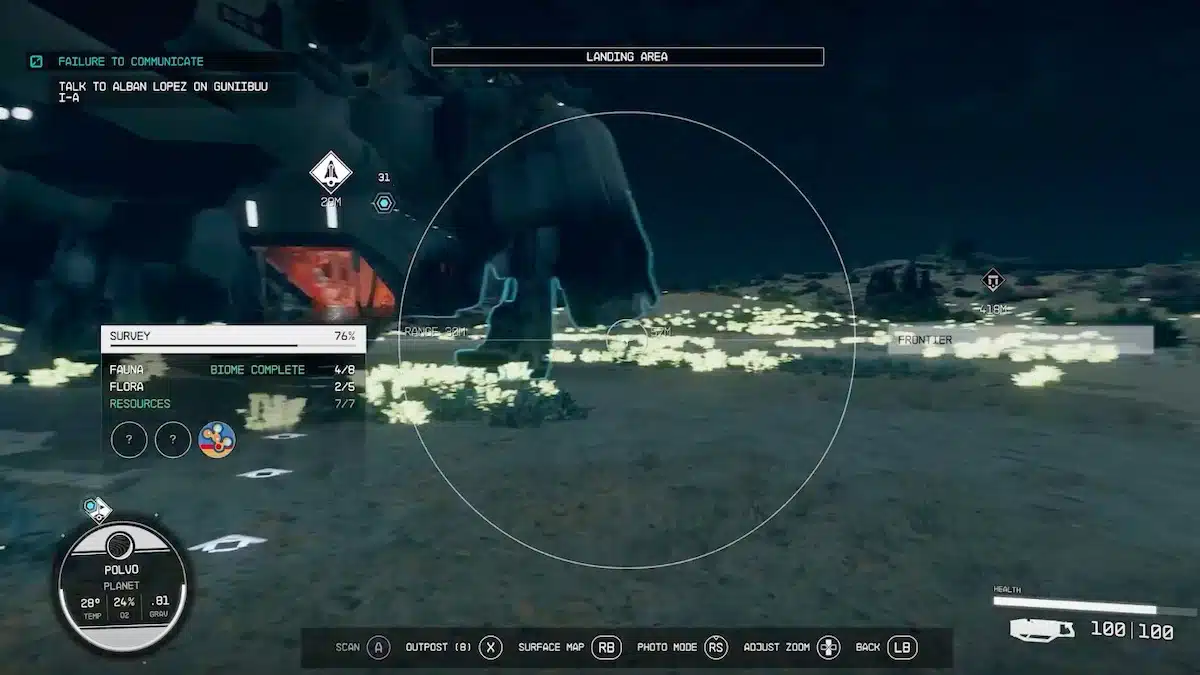
There’s more than one way to scan in Starfield. We’ll start with how to use the scanner in Starfield on the surface. Once you’re on the surface of a planet you’ll likely run into an area at some point that you want to scan. Once this happens, press F on a keyboard or LB on a controller. This brings up your scanner. This will then search out the entire environment and highlight some resources. Those with a blue outline or glowing will be illuminated as things of note. You’ll then know exactly what kind of materials are around you.
The different ways that things are highlighted will let you know key information. Those in blue are going to be made of a material that can be useful or a resource. Otherwise, there are other items which are glowing in green. These are things you can essentially leave. They’ve been scanned and you have the information already. You don’t need to do it again. Once you figure out what’s on the planet’s surface you’ll be able to use proper equipment to extract it.
Plants have a bit of a different system with how to scan in Starfield. For these, you might not get all the information at first. To get all of the info about plants or other living things, you’ll find to find it more than once. Essentially each time you see one of them you’ll get a piece of the puzzle. You will need to get every piece filled in to get the whole information.
That’s roughly how scanning works in Starfield, at least for when you’re roaming around the planet surface. There’s another method for how to scan in Starfield though. You could conduct an entire planet survey!
How to Use the Scanner in Starfield
If you want to get everything scanned before you even touch down, you’ll need to start surveying planets in full. That’s a major part of how to scan in Starfield. If you want to do this, the process starts when you’re still up in orbit. Still, there are so many planets in Starfield it makes sense to have an option like this. In the timeline of the game, there are still some unexplored bits.
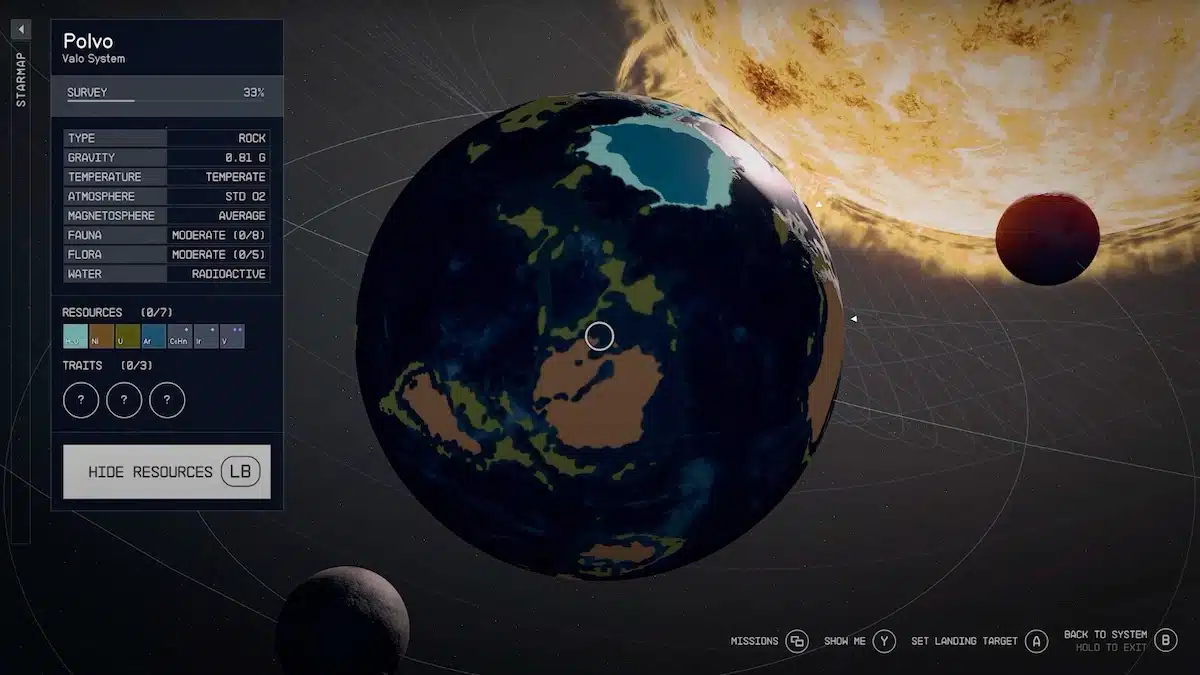
Once in the full orbit of a planet, you’ll have the option to scan. You can do this by pressing R on the keyboard. If you’re on a controller, you can press LB instead. Doing this will give you a different idea of what’s on the planet than scanning on the surface.
If you perform your scan in space, you’ll see which resources are on the planet. This is more of a general picture than up close but that’s to be expected from scanning in space. When it comes to picking landing sites, you’ll also get to see the resources near this spot. You’ll have full information when you do touch down. This isn’t as quick and easy as how to use the scanner in Starfield on the surface though.
Instead, a progress bar will pop up as you’re surveying the planet. This lets you know how much of the environment you’ve actually managed to scan! The areas that won’t be scanned will actually need exploring first. You won’t be able to reveal what’s until you get hands-on and head down to that spot yourself. Then, you’ll know exactly what’s located here on the planet.
How Scanning Works in Starfield – What is Highlighted?
Scanning in Starfield works really simply. Either above the planet or on it, you can scan certain areas to reveal plants, animals, buildings, and resources that are on the surface. This is a quick way to determine what’s on a particular planet. If you’re on a hunt for resources, you’ll need to zero in on planets that contain exactly what you want. You can do this easily once you know how to scan in Starfield. There are nearly as many planets as billboards thrown up, so getting a first-hand view of them is important for progression.
- SEO Powered Content & PR Distribution. Get Amplified Today.
- PlatoData.Network Vertical Generative Ai. Empower Yourself. Access Here.
- PlatoAiStream. Web3 Intelligence. Knowledge Amplified. Access Here.
- PlatoESG. Automotive / EVs, Carbon, CleanTech, Energy, Environment, Solar, Waste Management. Access Here.
- PlatoHealth. Biotech and Clinical Trials Intelligence. Access Here.
- ChartPrime. Elevate your Trading Game with ChartPrime. Access Here.
- BlockOffsets. Modernizing Environmental Offset Ownership. Access Here.
- Source: https://estnn.com/how-to-scan-in-starfield/
- a
- able
- About
- above
- actually
- again
- All
- along
- already
- also
- always
- ambitious
- an
- and
- animals
- Another
- any
- ARE
- AREA
- areas
- around
- as
- Assessing
- At
- bar
- basic
- BE
- been
- before
- Bethesda
- Biggest
- Bit
- Blue
- brings
- but
- by
- CAN
- certain
- check
- chemicals
- close
- comes
- completely
- conduct
- contents
- controller
- could
- Cut
- date
- deposits
- determine
- different
- do
- doing
- down
- each
- easily
- easy
- either
- entire
- Environment
- equipment
- Essentially
- even
- Every
- everyone
- everything
- exactly
- expansive
- expect
- expected
- Exploring
- extract
- Fiction
- Figure
- filled
- find
- First
- first-hand
- For
- from
- full
- fully
- Games
- Gaming
- General
- Get
- getting
- give
- going
- Green
- hands-on
- Handy
- happens
- Have
- head
- help
- here
- Highlight
- Highlighted
- How
- How To
- HTTPS
- hunt
- idea
- if
- important
- in
- info
- information
- instead
- into
- Is
- IT
- items
- jpg
- just
- Key
- Keyboard
- kind
- know
- knowing
- Land
- Landing
- landscape
- LB
- least
- leave
- like
- likely
- Limited
- living
- located
- made
- major
- MAKES
- man
- managed
- many
- materials
- means
- Method
- might
- more
- most
- much
- Near
- nearly
- need
- New
- no
- not
- of
- off
- on
- once
- One
- onto
- Option
- or
- Orbit
- Other
- otherwise
- out
- part
- particular
- Past
- Pay
- perform
- picking
- picture
- piece
- planet
- planets
- plants
- plato
- plato data intelligence
- platodata
- platogaming
- Point
- pop
- press
- pressing
- pretty
- probably
- Process
- Progress
- progression
- proper
- Puzzle
- quick
- quickly
- quite
- R
- really
- resource
- Resources
- reveal
- roughly
- RPG
- Run
- s
- Safety
- saves
- scan
- scanning
- Sci-Fi
- Science
- science fiction
- Search
- see
- sense
- set
- sets
- similar
- Simple
- Simply
- Sites
- So
- some
- Space
- Spot
- Starfield
- start
- Steps
- still
- such
- Surface
- Survey
- system
- taking
- than
- that
- The
- their
- Them
- then
- there
- These
- thing
- things
- this
- those
- though
- time
- to
- tons
- tool
- touch
- types
- unique
- universe
- until
- up
- use
- View
- walking
- want
- way
- ways
- What
- What is
- when
- where
- whole
- why
- will
- with
- works
- world
- worth
- you
- your
- yourself
- zephyrnet
- zero