These Brimstone Post-plant lineups will give you a competitive edge on Split

Credit: Riot Games
Brimstone has quickly become a fan-favorite among the passionate Valorant community thanks to its remarkable capacity to enhance team performance with minimal skill requirements. Every single one of his exceptional abilities has a profound impact on his team’s overall success.
For instance, his smoke bombs provide crucial cover while launching an attack and disrupt the opponent’s executes when defending. The steam beacon is an invaluable asset in battle, providing unparalleled strategic and combat benefits in firefight scenarios.
The incendiary ability is an incredibly versatile tool that can be effectively employed in many scenarios. This article will explore the scope of utilizing this tool of Brim’s kit to its maximum potential. Aspiring veterans will learn the most exquisite Brimstone lineups that they can deftly employ to embark on a victorious journey through the terrain of Split.
The A site on Split holds immense strategic significance for attackers, as it presents a golden opportunity to seize control through calculated utilization of agent abilities. Mastering the art of countering retaking defenders is an essential aspect that demands your utmost focus and dedication. Discover these game-changing post-plant lineups that will elevate your tactical prowess as a skilled Brimstone player, enabling you to counter any well-coordinated retake efforts from your opponents effectively.
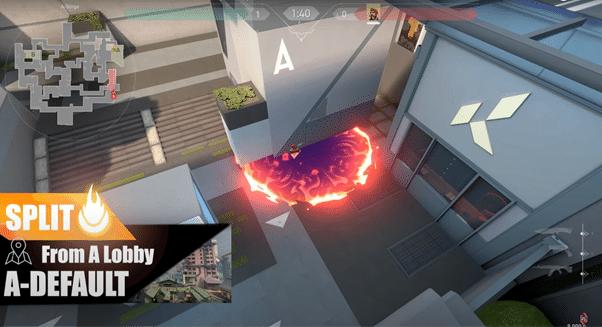
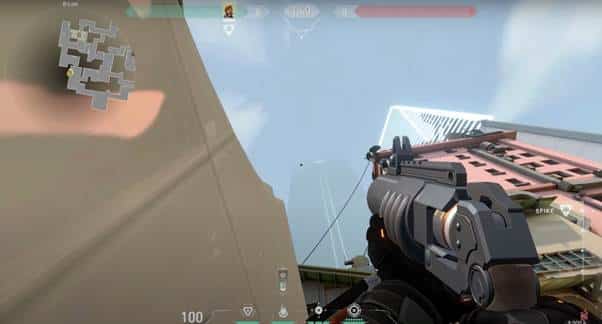
A Default from Lobby
When securing the spike planting, opting for a Default spot provides unparalleled protection. The following lineup’s utilization proves invaluable when positioned within the Lobby area after successfully planting the spike.
Credit: LineUp TV
Step 1: Approach the point marked in the below picture.
Credit: LineUp TV
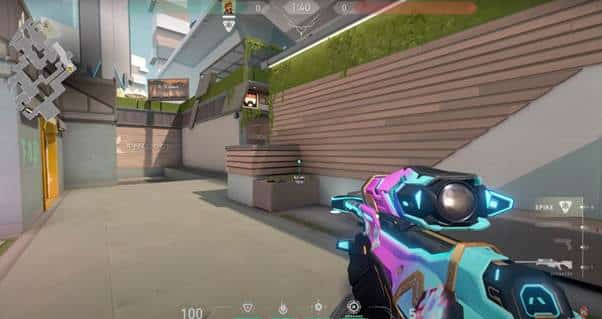
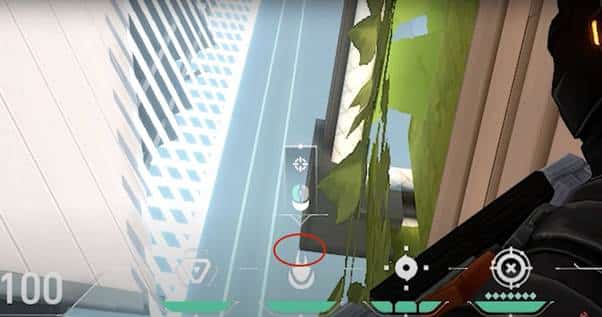
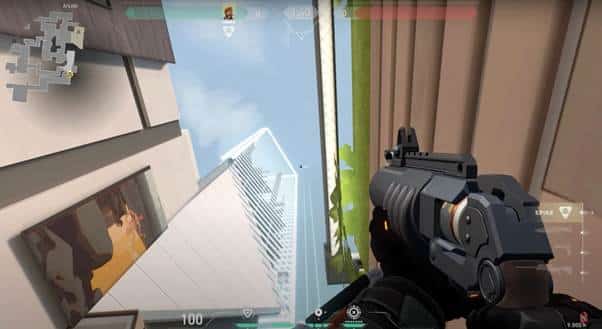
Step 2: Aim your crosshair at the top right side of the big transparent building at the furthest distance.

Credit: LineUp TV
Step 3: A simple left-click launch will land the molly in your desired A Default location.
A Screen from Lobby
The Screen, a well-known plant location, is a crucial spot on the renowned Split A site. Numerous skilled attackers often opt for this strategic position as a viable alternative to the conventional planting spot of A Default. Mastering the art of thwarting a defender’s attempt to defuse the spike on Screen is an invaluable skill that will undoubtedly enhance your journey toward becoming a Radiant.

Step 1: Approach the point marked in the below picture.

Credit: LineUp TV
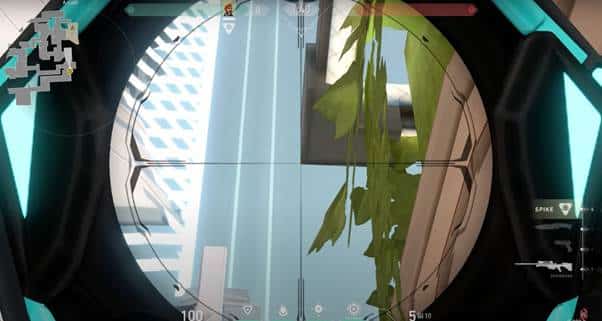
Step 2: The part of the ceiling being aimed at must be lined up with the fire icon of your bottom HUD. Refer to the below pictures for a better understanding.
Credit: LineUp TV
Credit: LineUp TV
Step 3: Stand still and launch the molly with a simple left click after getting the HUD in the correct position. This lineup should shatter all hopes of winning the round for a defusing defender.
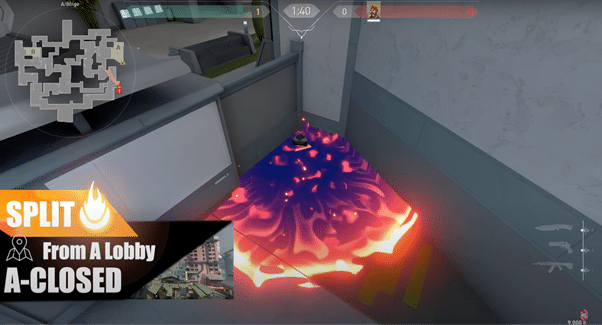
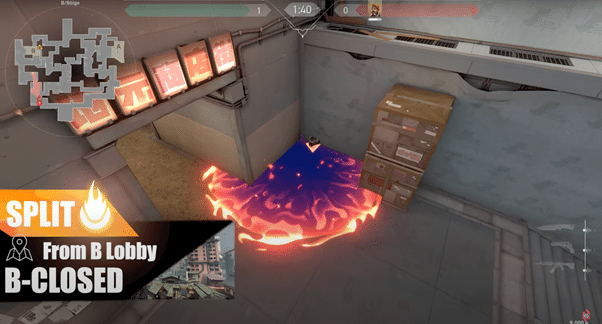
A Closed from A Lobby
The Closed location of A site holds enormous tactical value for the attacking team as it is a pivotal area for setting up a secure plant. This strategic position offers many opportunities for attackers to defend the spike post-plant successfully, and its lineup potential is truly immense. Hence, encourage your teammates to work toward a strategic plant in this precise spot and witness the sheer magic of your meticulously crafted lineup as it performs its enchantment.
Credit: LineUp TV
Step 1: Approach the marked location on A Lobby.

Credit: LineUp TV
Step 2: The right side of the right horizontal line of your HUD must be aligned with the spot where the crosshair below is currently lined up.
Credit: LineUp TV
Credit: LineUp TV
Step 3: Stand still and launch the incendiary to gain a perfect landing on the target.
A Corner from Lobby
Introducing the A Corner location, a remarkable alternative to the famous A Closed spot. However, one could make the case that this area’s reduced post-plant defensive scopes serve as a compromise for the comparatively safer planting spot. Worry not, for I present an exceptional post-plant molly lineup that will elevate your chances for success to new heights. Prepare to showcase your clutch prowess once more, utilizing your favorite agent Brimstone.
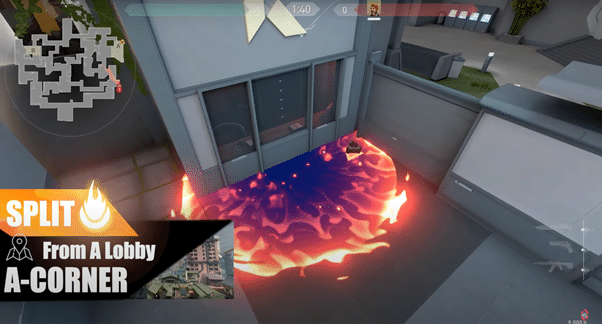
Credit: LineUp TV
Step 1: Walk towards the marked location on A Lobby and get on top of the tub.
Credit: LineUp TV
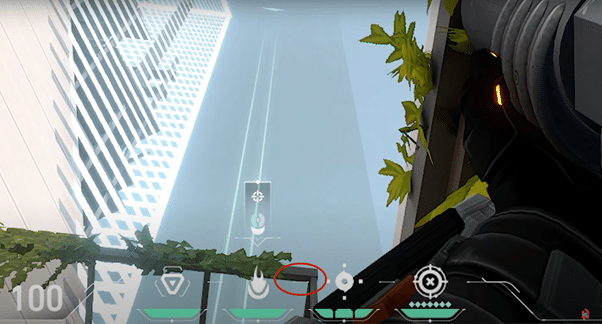
Step 2: Aim your crosshair at the top right side of the big transparent building at the furthest distance.
Credit: LineUp TV
Step 3: A simple left-click launch will land the molly in your desired A Default location.
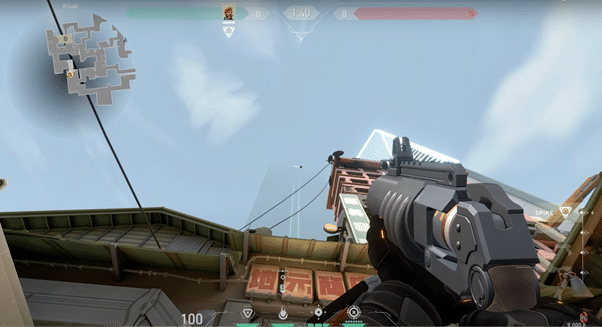
A-Open from Lobby
If your team successfully secures the A Site from enemy defenders, they may want to secure the round by opting for an open plant on the A site. What is it about this spot that’s so incentivizing for the attackers, you ask? Well, despite making the planter open to attack from any direction, if one could secure the plant, the post-plant phase of the round becomes a breeze. Defenders will struggle the most while defusing in this spot, and to add insult to injury, consider employing this highly efficient molly lineup.
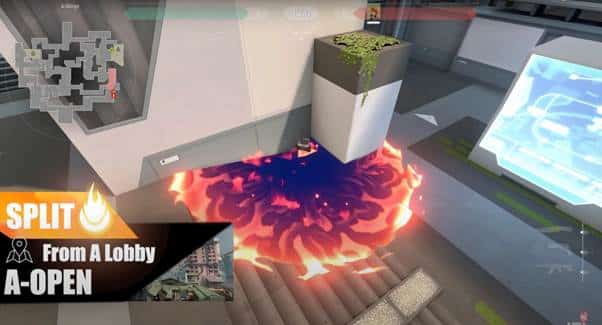
Credit: LineUp TV
Step 1: Approach the point marked in the below picture.

Credit: LineUp TV
Step 2: Aim your crosshair at the top left side of the big transparent building at the furthest distance.
Credit: LineUp TV
Step 3: A simple left-click launch will disrupt any effort of an audacious defender in defusing the spike.
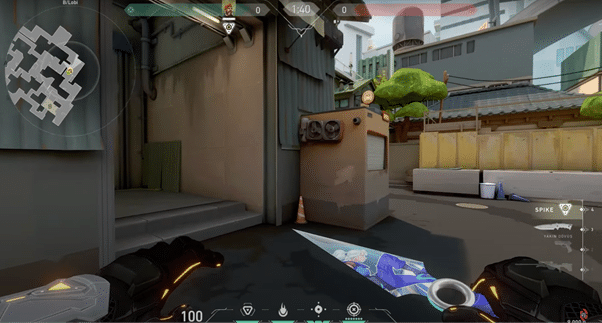
B site is a treacherous battleground that demands utmost finesse and cunning to breach its defenses. Once the spike is set in place, a duty befalls upon the attackers to shield it from the retake attempts of their adversaries. Brimstone, the outstanding agent, truly excels in this endeavor, as his Incendiary ability boasts remarkable utility in thwarting defuses from considerable distances. Today, we shall delve into a selection of immensely beneficial Brimstone post-plant lineups tailored explicitly for the B site on the famous map of Split.
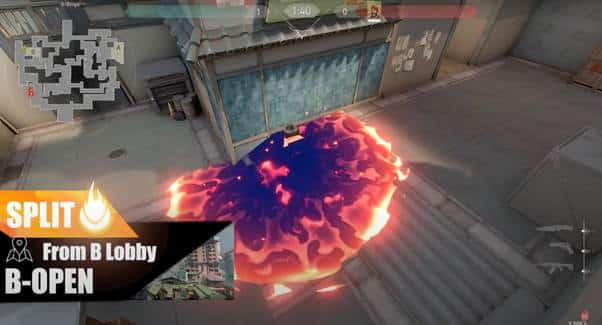
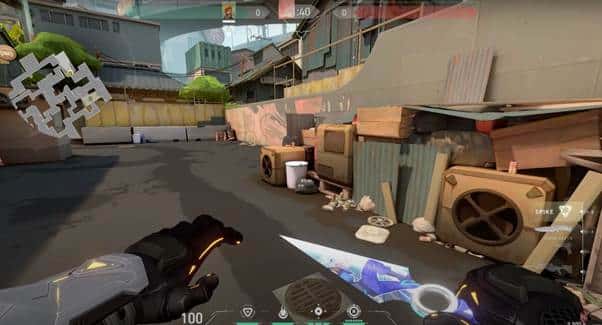
B Open Plant from Main
The B Open site is the best place to plant a spike because it gives the defenders the tiniest edge when defusing it. In this spot, the defusers only have a few wall covers to protect them from attacks coming from all sides. Learning this Brimstone lineup can be a massive step towards solidifying your victory on the B site after getting the open plant.
Credit: LineUp TV
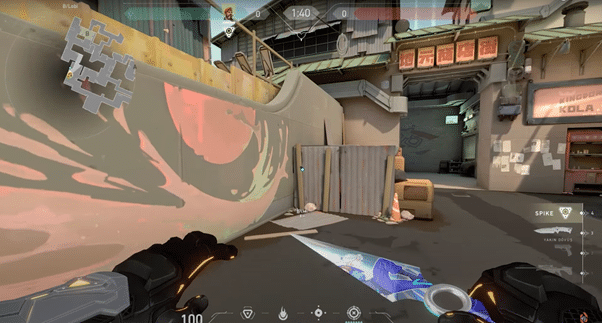
Step 1: Get stuck in the corner marked in the below picture on the B Lobby location.
Credit: LineUp TV
Step 2: Aim right here, as shown in the below picture; however, not with your crosshair. For effective execution of this lineup, you need to line the smoke icon of your HUD up with this very spot. Refer to the pictures below for better understanding.
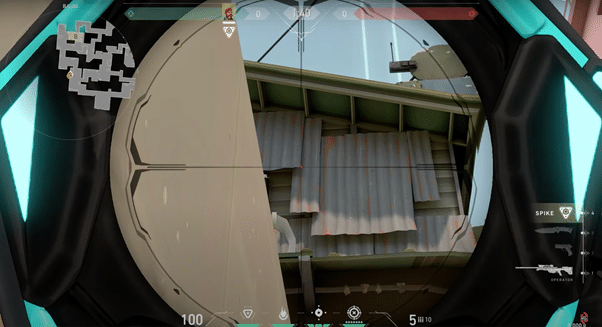
Credit: LineUp TV
Credit: LineUp TV
Step 3: Stand still and shoot the fire button to launch the molly toward B Open plant spot. It will take substantial time to land, so accurate anticipation of the defuser’s timing will be necessary for this one to succeed.
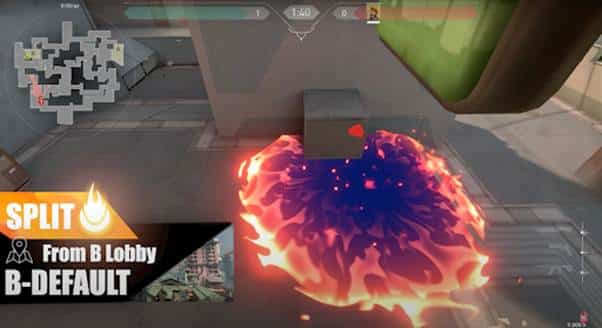
B Default from Lobby
If you manage to seize control of site B, the option of a default spike plant becomes very alluring. This one protects you from each direction an enemy could come from while you’re setting up the spike. Despite its relative safety, defending the spike in this area from countering enemies can be challenging. As a result, having a strong Brimstone lineup can swing the odds in your favor.
Credit: LineUp TV
Step 1: Walk into this corner of B Lobby.
Credit: LineUp TV
Step 2: Simply aim your crosshair at the shown spot.
Step 3: Stand still and launch the Incendiary. This lineup is highly efficient, as the utility will land quickly to disrupt defusing attempts.
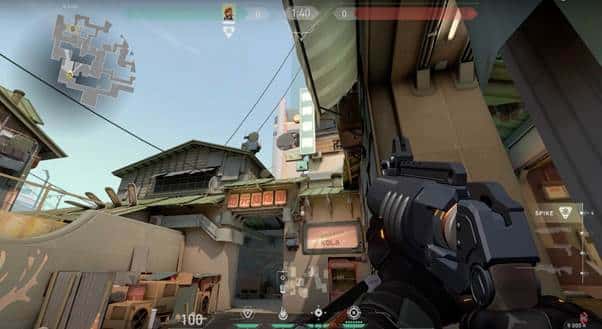
B Closed from Lobby
The B Closed is a viable plant spot when the attackers successfully seize control of the B site. Opting for the default and open plant position frequently will cause the defenders to adapt to your predictable patterns and employ counter strategies to disrupt your plant attempts. Therefore, attempting a B Closed spike plant will add an element of unpredictability to your tactics. To put the icing on the cake, this B Closed Incendiary lineup can almost guarantee your team a round victory after securing a successful plant.
Credit: LineUp TV
Step 1: Walk towards the marked spot shown in the below picture.
Credit: LineUp TV
Step 2: Aim your crosshair at the top right side of the big transparent building at the furthest distance.
Credit: LineUp TV
Step 3: Press your fire button to launch the Incendiary while standing still. Again, accurate anticipation of the defuser’s timing is necessary to find success with this lineup.
Step up your game with more valuable guides like this, available only on ESTNN.
- SEO Powered Content & PR Distribution. Get Amplified Today.
- PlatoData.Network Vertical Generative Ai. Empower Yourself. Access Here.
- PlatoAiStream. Web3 Intelligence. Knowledge Amplified. Access Here.
- PlatoESG. Automotive / EVs, Carbon, CleanTech, Energy, Environment, Solar, Waste Management. Access Here.
- BlockOffsets. Modernizing Environmental Offset Ownership. Access Here.
- Source: https://estnn.com/brimstone-essential-post-plant-lineups-to-dominate-split/
- 1
- 320
- a
- abilities
- ability
- About
- accurate
- adapt
- add
- after
- again
- aim
- aimed
- All
- alternative
- among
- an
- and
- anticipation
- any
- AREA
- Art
- article
- as
- aspect
- aspiring
- asset
- At
- attacks
- attempts
- audacious
- available
- Battle
- BE
- beacon
- because
- become
- becomes
- becoming
- being
- below
- beneficial
- benefits
- BEST
- Better
- BIG
- boasts
- bottom
- breach
- Brimstone
- Building
- button
- by
- calculated
- CAN
- Capacity
- case
- Cause
- challenging
- chances
- click
- closed
- combat
- come
- coming
- community
- comparatively
- Competitive
- compromise
- Consider
- considerable
- Control
- conventional
- corner
- correct
- could
- counter
- cover
- covers
- crucial
- currently
- dedication
- defensive
- demands
- desired
- despite
- direction
- discover
- Disrupt
- distance
- dominate
- each
- Edge
- Effective
- effectively
- efficient
- effort
- efforts
- element
- ELEVATE
- embark
- employed
- enabling
- encourage
- endeavor
- enhance
- essential
- Every
- exceptional
- execution
- explore
- favor
- favorite
- few
- find
- Fire
- Focus
- Following
- For
- frequently
- from
- gain
- game
- Get
- getting
- give
- gives
- golden
- guarantee
- Guides
- has
- Have
- having
- heights
- hence
- here
- highly
- his
- holds
- hopes
- however
- HTTPS
- i
- ICON
- if
- immense
- immensely
- Impact
- in
- incentivizing
- incredibly
- injury
- instance
- Insult
- into
- invaluable
- Is
- IT
- ITS
- journey
- jpg
- kit
- Land
- Landing
- launch
- launching
- LEARN
- learning
- left
- like
- Line
- lined
- location
- Magic
- make
- Making
- manage
- many
- map
- marked
- massive
- Mastering
- maximum
- May
- meticulously
- more
- most
- must
- necessary
- need
- New
- not
- numerous
- Odds
- of
- Offers
- often
- on
- once
- One
- only
- open
- opponents
- opportunities
- Opportunity
- Option
- outstanding
- overall
- part
- passionate
- perfect
- performance
- phase
- picture
- pivotal
- place
- plato
- plato data intelligence
- platodata
- platogaming
- player
- Point
- position
- positioned
- potential
- precise
- predictable
- prepare
- present
- presents
- profound
- protect
- protection
- proves
- Provide
- provides
- providing
- prowess
- put
- quickly
- RE
- Reduced
- relative
- remarkable
- renowned
- Requirements
- result
- right
- round
- s
- safer
- Safety
- Scenarios
- scope
- Screen
- secure
- Secures
- securing
- Seize
- selection
- serve
- set
- setting
- shield
- should
- Showcase
- shown
- side
- sides
- significance
- Simple
- single
- site
- skill
- skilled
- So
- spike
- split
- Spot
- standing
- Steam
- step
- still
- Strategic
- Strategies
- strong
- substantial
- succeed
- success
- successful
- successfully
- Swing
- tactical
- tactics
- tailored
- Take
- Target
- Team
- thanks
- that
- The
- their
- Them
- therefore
- These
- they
- this
- Through
- time
- timing
- to
- Today
- tool
- top
- toward
- towards
- transparent
- truly
- understanding
- undoubtedly
- unparalleled
- up
- upon
- utility
- utilizing
- VALORANT
- valuable
- value
- versatile
- very
- Veterans
- victorious
- victory
- Wall
- want
- we
- well
- well-known
- What
- What is
- when
- where
- while
- will
- winning
- with
- within
- witness
- Work
- worry
- you
- your
- zephyrnet