Here’s a list of 4 utility line-ups to use on Vertigo in Counter-Strike 2.
Vertigo was one of the most dynamic maps in the map pool of CS:GO. Even in Counter-Strike 2, Valve’s next sequel in the CS franchise, the potency of this map can be seen thoroughly. There are numerous ways to approach the way a game is played here and considering the love-hate relationship players have with Vertigo, the variety can be quite overwhelming. For this reason, the utility line-ups were critical. Without dependable utility, this map is very static.
But as the Counter-Strike evolves, the way these line-ups are used also changes. Due to the maps here being reworked, the old line-ups from CS:GO are useless here. So the community scrambles to find ways to develop new ones and reform the old ones. As these pieces of utility are crucial in Vertigo, it is essential to find ways to execute them in CS2.
So we have come up with our list to show you five very useful line-ups for Flashbangs and Molotovs to help you out in your next match on Vertigo.
Ramp Entry Denying Molotov
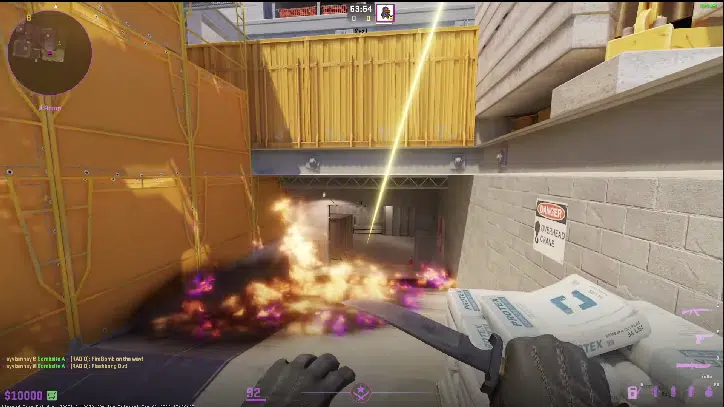
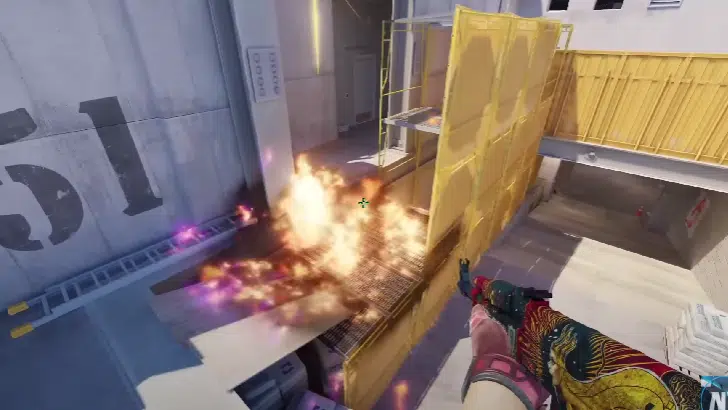
A-Site Crane to Ramp
The A-Site is pretty strong for CT players due to its defensive nature. There are numerous positions to hold from and take fights. But during low buys and when facing a fast and aggressive rush from the Terrorists, it is necessary to blockade the opposition quickly before taking any defensive positions. A well-armed team with high momentum can out-gun the CT players and take site, making for a very tough retake.
Credits: ayykennay
This Molotov line-up specializes in exactly that. As it is thrown from safety it covers the entirety of Ramp. Thus any fast execution toward the A-Site is slowed down and gives the CT side a chance to regroup.
Immediate Effects
The main entryway into the A-Site, which is Ramps, will be completely blocked off. As it is a Molotov, most teams are forced to respect it and hold back the push. Since the throw is quite fast, teams don’t get the chance to smoke off the fire. This causes most teams to either change their strategy and go for another attempt at the A-Site or rotate to B as they got denied. Either way, this gives the CT side a moment to reorganize themselves and set up for defending the site.
Available Options
- Take position near Sidewalk and Scaffolding to defend the site.
- Setup in Sandbags without risk of dying.
- Flash to help someone peek for an extra kill.
- Have an AWP peek down at Ramps.
- Follow-up smoke to deny entry further.
Ramp Rush Denying Flashbang
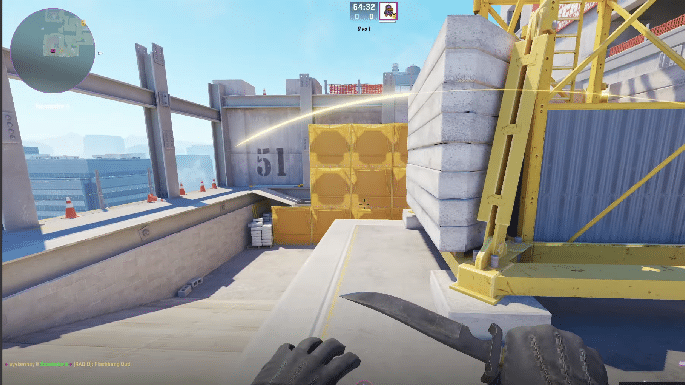
A-Site to Ramps/Sidewalk
Another piece of utility that helps slow down a fast push towards Ramps from the T side. A rush from the Terrorists is quite common and often done during eco rounds to get control of the site easily. This allows the T side to plant the bomb and grab some guns. As the CT players cannot take position and hold strong angles to defend the site, a fast execution can be a fatal weakness.
Credits: ayykennay
For that exact reason, this flashbang is so useful. An early throw of the line-up allows the CT players to slow down the fast-rushing opposition running at them. As this will hit anyone looking at Ramps, players can go for a pick while the T players are blinded, especially AWPers. Thus any kind of rush can be disrupted and dismembered.
Immediate Effects
Completely blinds anyone looking at Ramps. The flash extends up to Sheets, behind the Big Box below the A-Site. Anyone in that vicinity will be blinded and made vulnerable. If a team decides to rush through Ramps, this flashbang alongside a Molotov and smoke grenades can successfully push them back without gunfights. A skilled player can even find a kill if the timing of the peak is good.
Available Options
- Peek Ramps to get a quick kill.
- Take position in Scaffoldings.
- Take position in Sandbags.
- Follow up with Molotovs and smoke grenades.
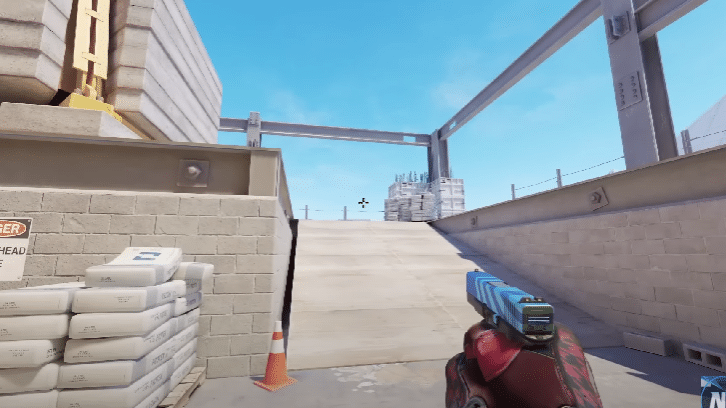
Early Ramp Flash to Deny Peek
Ladder to Top of Sidewalk
This lineup is sort of the exact counter to the previous flash to deny entry to the site of A. Usually, teams set up an AWPer or multiple players from Ramps and Scaffoldings to peek together after a flashbang to deny entry to the A-Site. This can cause the T side to not only lose players but also have to switch up their plans.
Credits: NartOutHere
This flashbang allows the Terrorists to have a chance to execute the site. A fast rush can be accomplished with this line-up as it flashes anyone from the CT who was holding on the other side of Ramps to go for a peek. If this player can be pushed back and the flashbang dismembers the CT side long enough for the push to commence. It will be a piece of cake for the bomb to be planted.
Immediate Effects
Anyone peeking from Crane or looking to throw any entry-denying piece of utility will be blinded. This allows for easy entry to the A-Site. Any CT pushed far enough outside towards the A-Site entry will be vulnerable and easy to kill. This will also blind anyone in Sandbags, so they will be denied a chance to peek, and easy to take out with utility. Scaffolding access can be gained as well for a flank push from Sidewalk.
Available Options
- Push up to Ramps.
- Push up to Sidewalk.
- Clear Sandbags.
- Take out any blinded CT positioned close.
- Set up for A-Site execution.
- Fake A-Site push and rotate to B.
Sidewalk Control Molotov (1, 4:16)
Ladder to Sidewalk/Scaffolding
Scaffolding is one of the strongest angles to hold while trying to defend the A-Site. As it is a difficult angle to clear and can dissect any fast rush to A if not cleared, it poses a great danger for the Terrorist side. AWPers are particularly dangerous here. So clearing with utility is necessary.
Credits: NartOutHere
This Molotov is positioned perfectly to push back anyone holding through here. Due to the coverage of the flames the CT side will be forced to fall back and give control to the attacking T players. This also creates an avenue to rush to A.
Immediate Effects
As one of the strongest angles used to defend the A-Site is taken offline, an opening is formed for the Terrorists to push to A. As the Scaffolding player will be damaged by the Molotov, it will be easy to pick him off as well. This also forces players from other angles to peak, as those are weaker they will be easier to take out. The entire defense of the CT players on the A-Site will be shaken up from this single flash and it opens up many ways to explode onto the site.
Available Options
- Push ahead to Ramps.
- Trade-off anyone holding in Sandbags.
- Push towards Sidewalks for double-sided push.
- Prepare to execute to A will a fast rush.
- Fake rush to A and rotate to the B-Site.
Be sure to check out our ever-expanding library of guides for CS2 and many other games to help you perform better in your next match.
- SEO Powered Content & PR Distribution. Get Amplified Today.
- PlatoData.Network Vertical Generative Ai. Empower Yourself. Access Here.
- PlatoAiStream. Web3 Intelligence. Knowledge Amplified. Access Here.
- PlatoESG. Carbon, CleanTech, Energy, Environment, Solar, Waste Management. Access Here.
- PlatoHealth. Biotech and Clinical Trials Intelligence. Access Here.
- Source: https://estnn.com/counter-strike-2-vertigo-utility-line-ups/
- 1
- 16
- 385
- a
- access
- accomplished
- after
- aggressive
- ahead
- allows
- alongside
- also
- an
- and
- Another
- any
- anyone
- approach
- ARE
- as
- At
- attempt
- awp
- back
- BE
- before
- behind
- being
- below
- Better
- BIG
- blocked
- bomb
- Box
- but
- by
- CAN
- Cause
- chance
- change
- changes
- check
- clear
- clearing
- close
- come
- Common
- community
- Competitive
- completely
- considering
- Control
- counter
- Counter-Strike
- coverage
- covers
- creates
- critical
- crucial
- cs
- CS:GO
- cs2
- Danger
- dangerous
- Defense
- defensive
- denied
- dependable
- develop
- difficult
- done
- down
- due
- During
- dynamic
- Early
- easier
- easily
- easy
- either
- enough
- entire
- entry
- especially
- essential
- even
- evolves
- exactly
- execute
- execution
- extends
- facing
- fall
- far
- FAST
- fights
- find
- Fire
- five
- Flash
- For
- forced
- forces
- Franchise
- from
- further
- gained
- game
- Games
- Get
- give
- gives
- go
- good
- got
- grab
- great
- Guides
- guns
- Have
- help
- helps
- here
- High
- him
- HIT
- hold
- holding
- HTTPS
- if
- in
- into
- Is
- IT
- ITS
- kind
- Library
- List
- Long
- looking
- lose
- Low
- made
- main
- Making
- many
- map
- Maps
- Match
- matches
- Molotov
- moment
- Momentum
- most
- multiple
- nature
- Near
- necessary
- New
- Next
- not
- numerous
- of
- off
- offline
- often
- Old
- on
- One
- ones
- only
- onto
- opening
- opens
- opposition
- or
- Other
- our
- out
- outside
- overwhelming
- particularly
- peak
- perfectly
- perform
- pick
- piece
- Piece of Cake
- pieces
- plans
- plato
- plato data intelligence
- platodata
- platogaming
- played
- player
- players
- pool
- poses
- position
- positioned
- potency
- pretty
- previous
- push
- pushed
- quick
- quickly
- quite
- Ramp
- reason
- reform
- relationship
- respect
- Risk
- rotate
- rounds
- running
- rush
- s
- Safety
- seen
- sequel
- set
- show
- side
- since
- single
- site
- skilled
- slow
- So
- some
- someone
- specializes
- Strategy
- strong
- successfully
- sure
- Switch
- Take
- taken
- taking
- Team
- teams
- terrorist
- that
- The
- their
- Them
- themselves
- there
- These
- they
- this
- those
- Through
- Thus
- timing
- to
- together
- top
- tough
- toward
- towards
- trying
- up
- use
- used
- usually
- utility
- valve
- variety
- very
- Vulnerable
- was
- way
- ways
- we
- weakness
- well
- were
- when
- while
- WHO
- will
- with
- without
- you
- your
- youtube
- zephyrnet